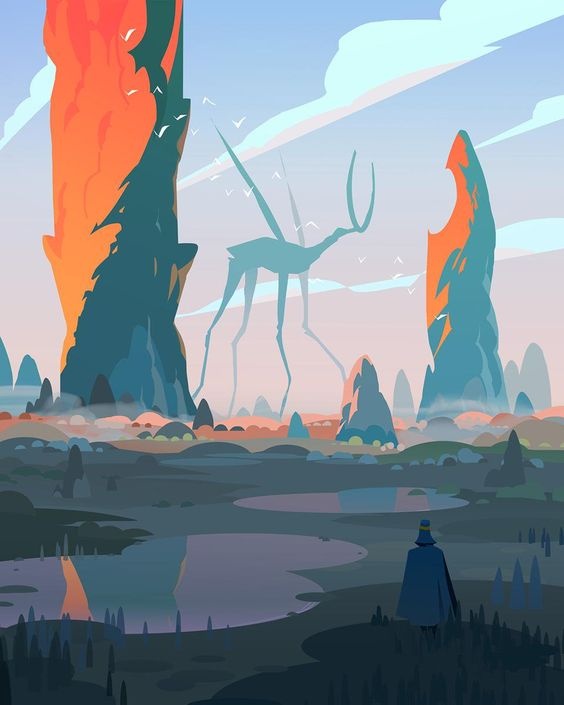
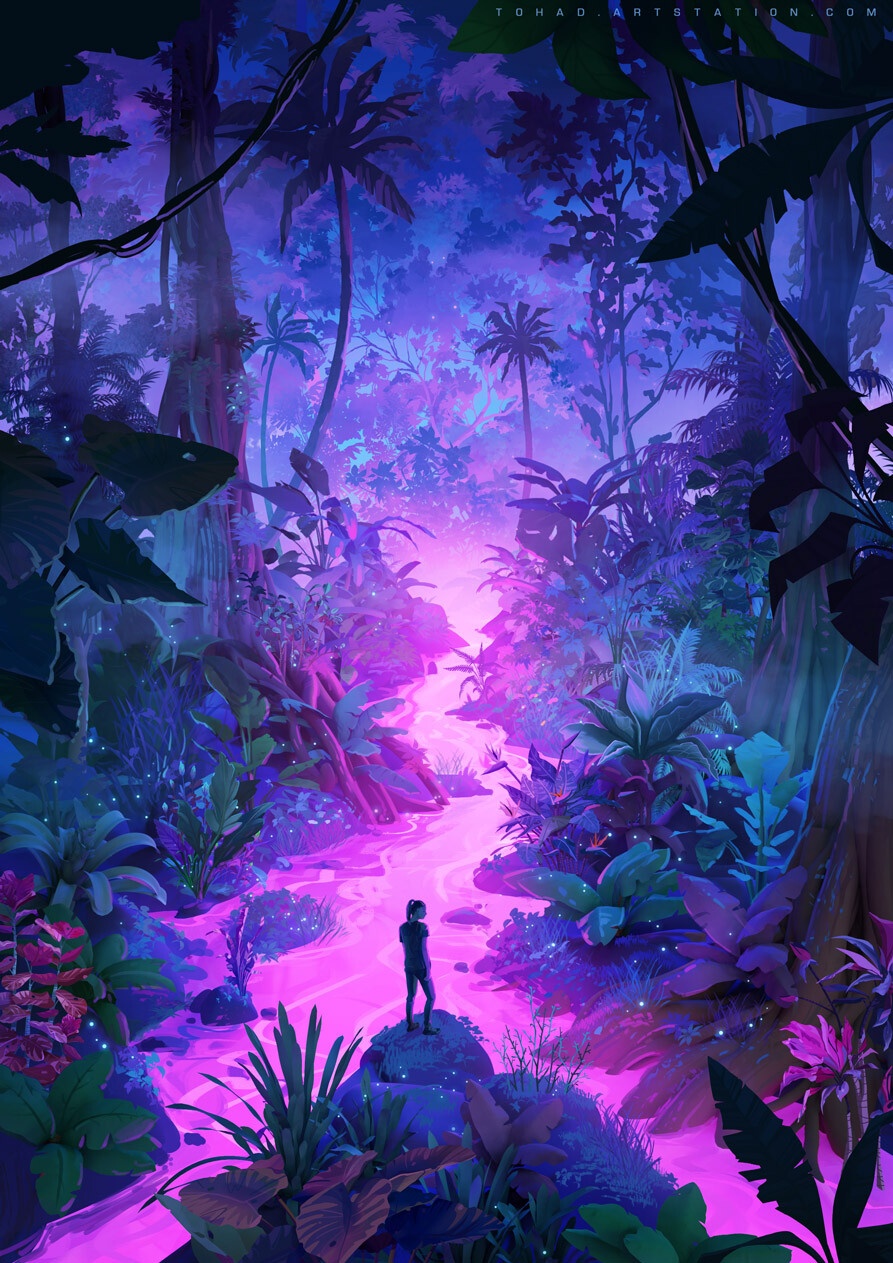
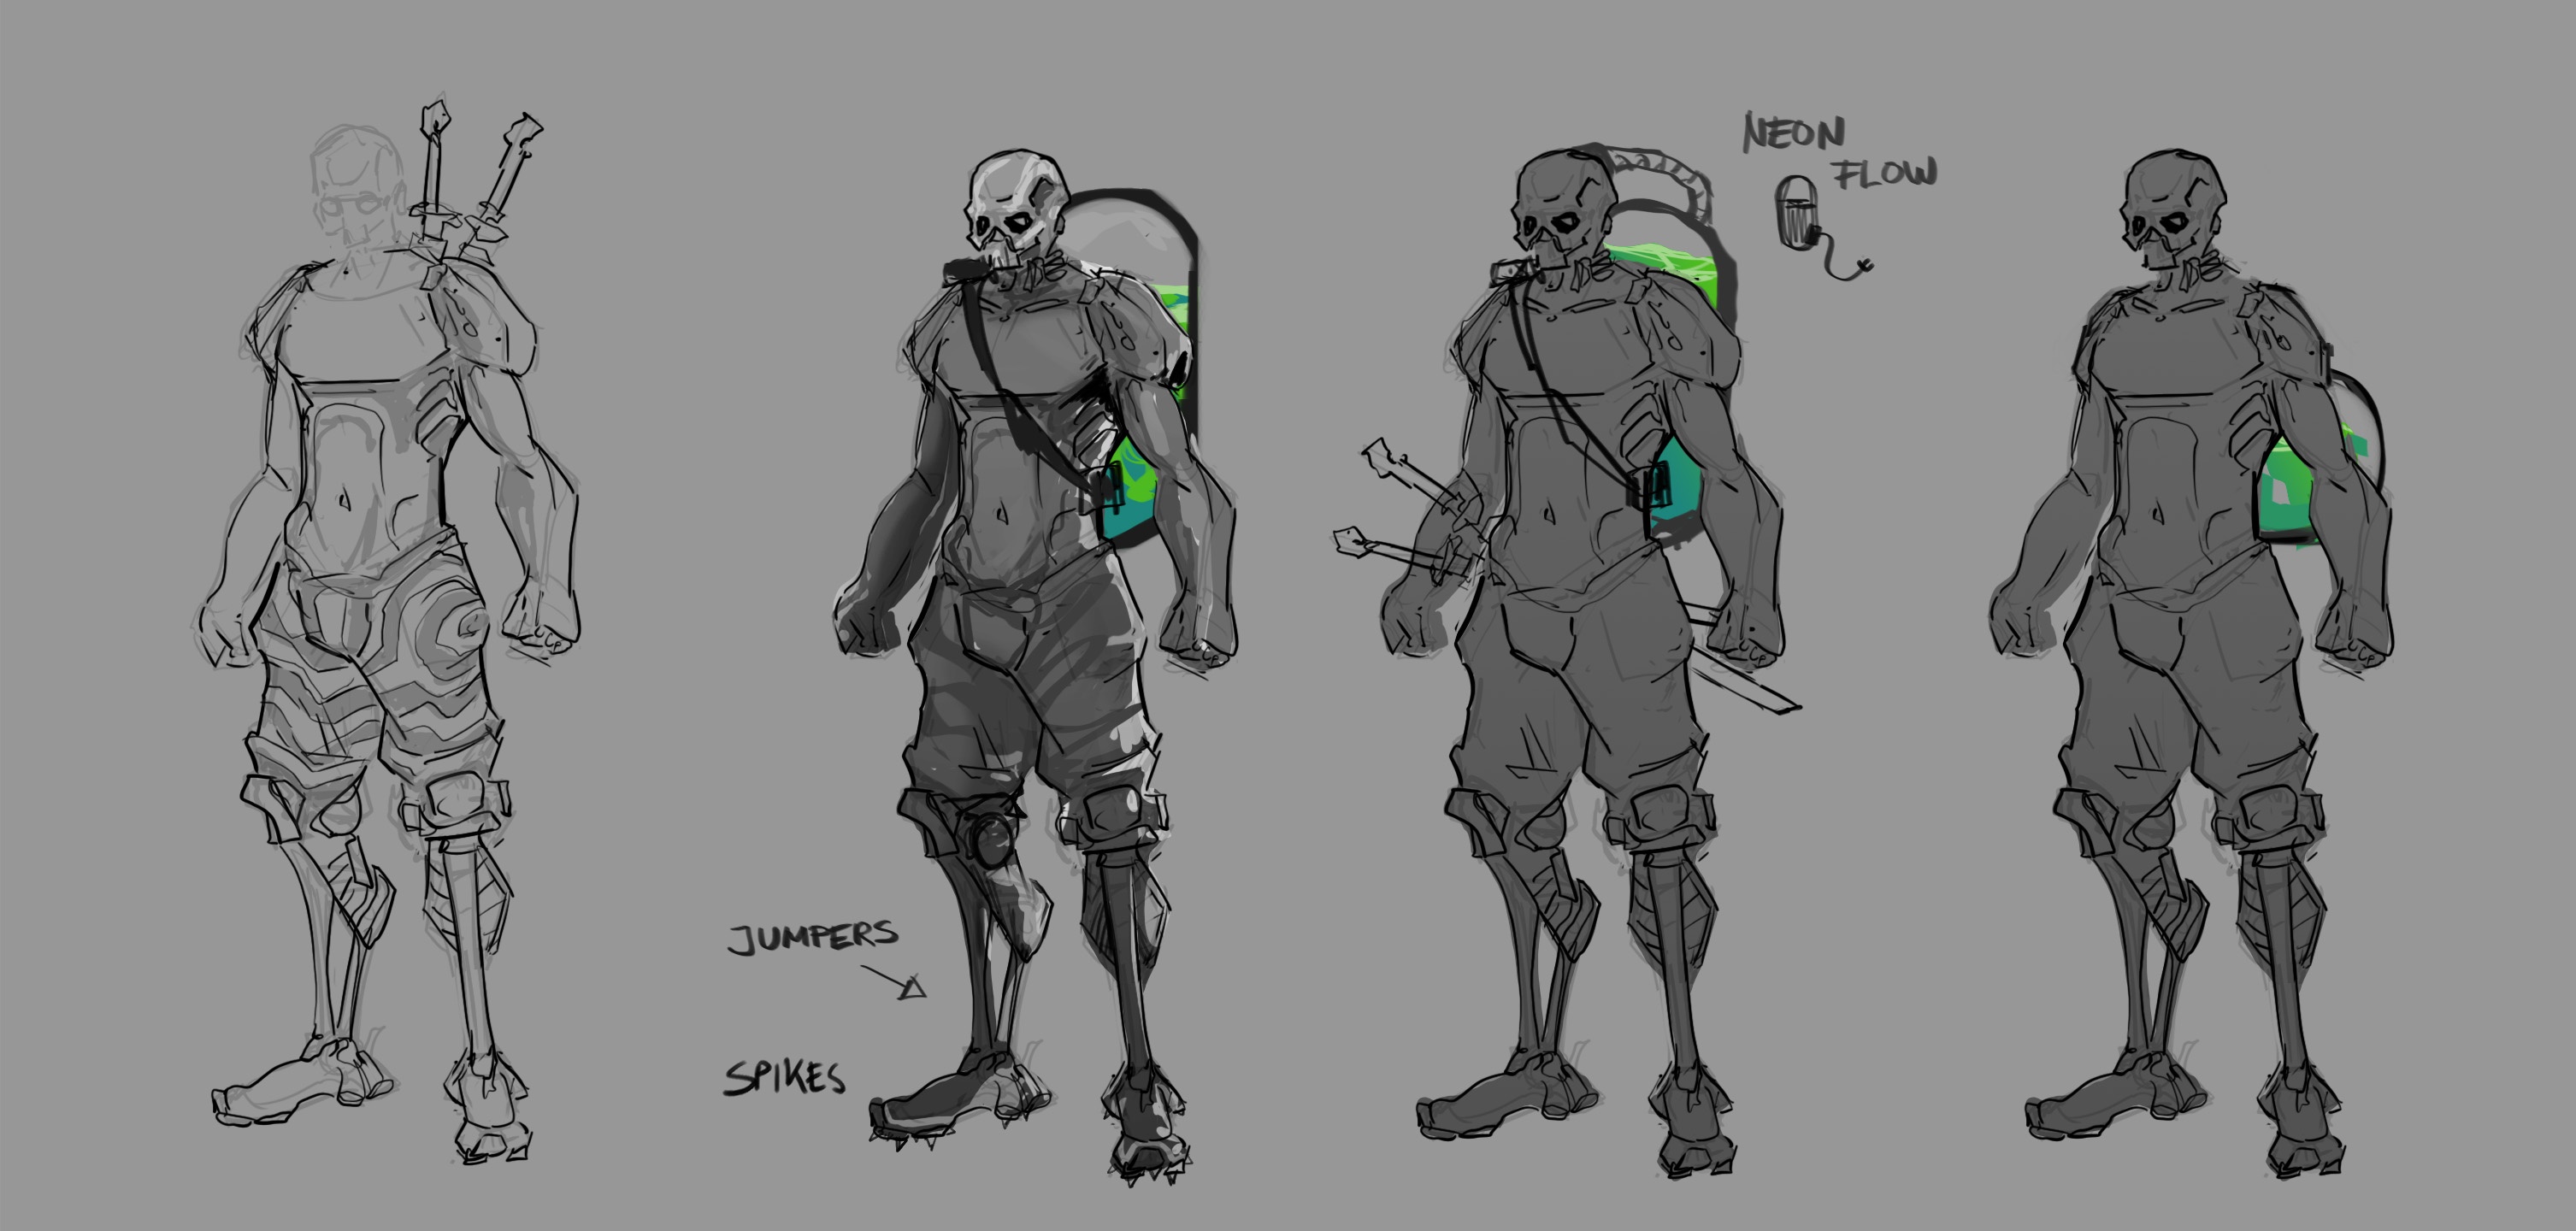
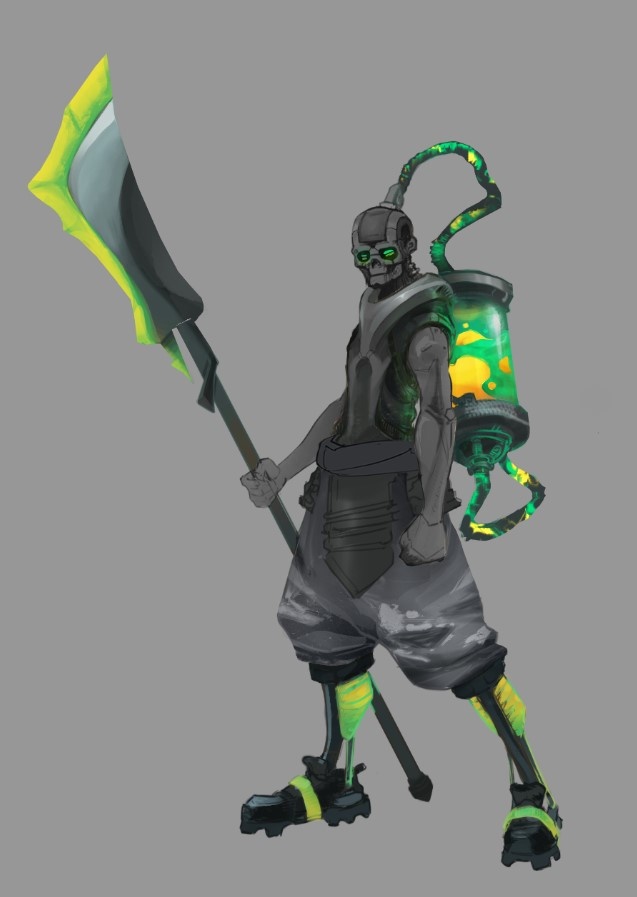
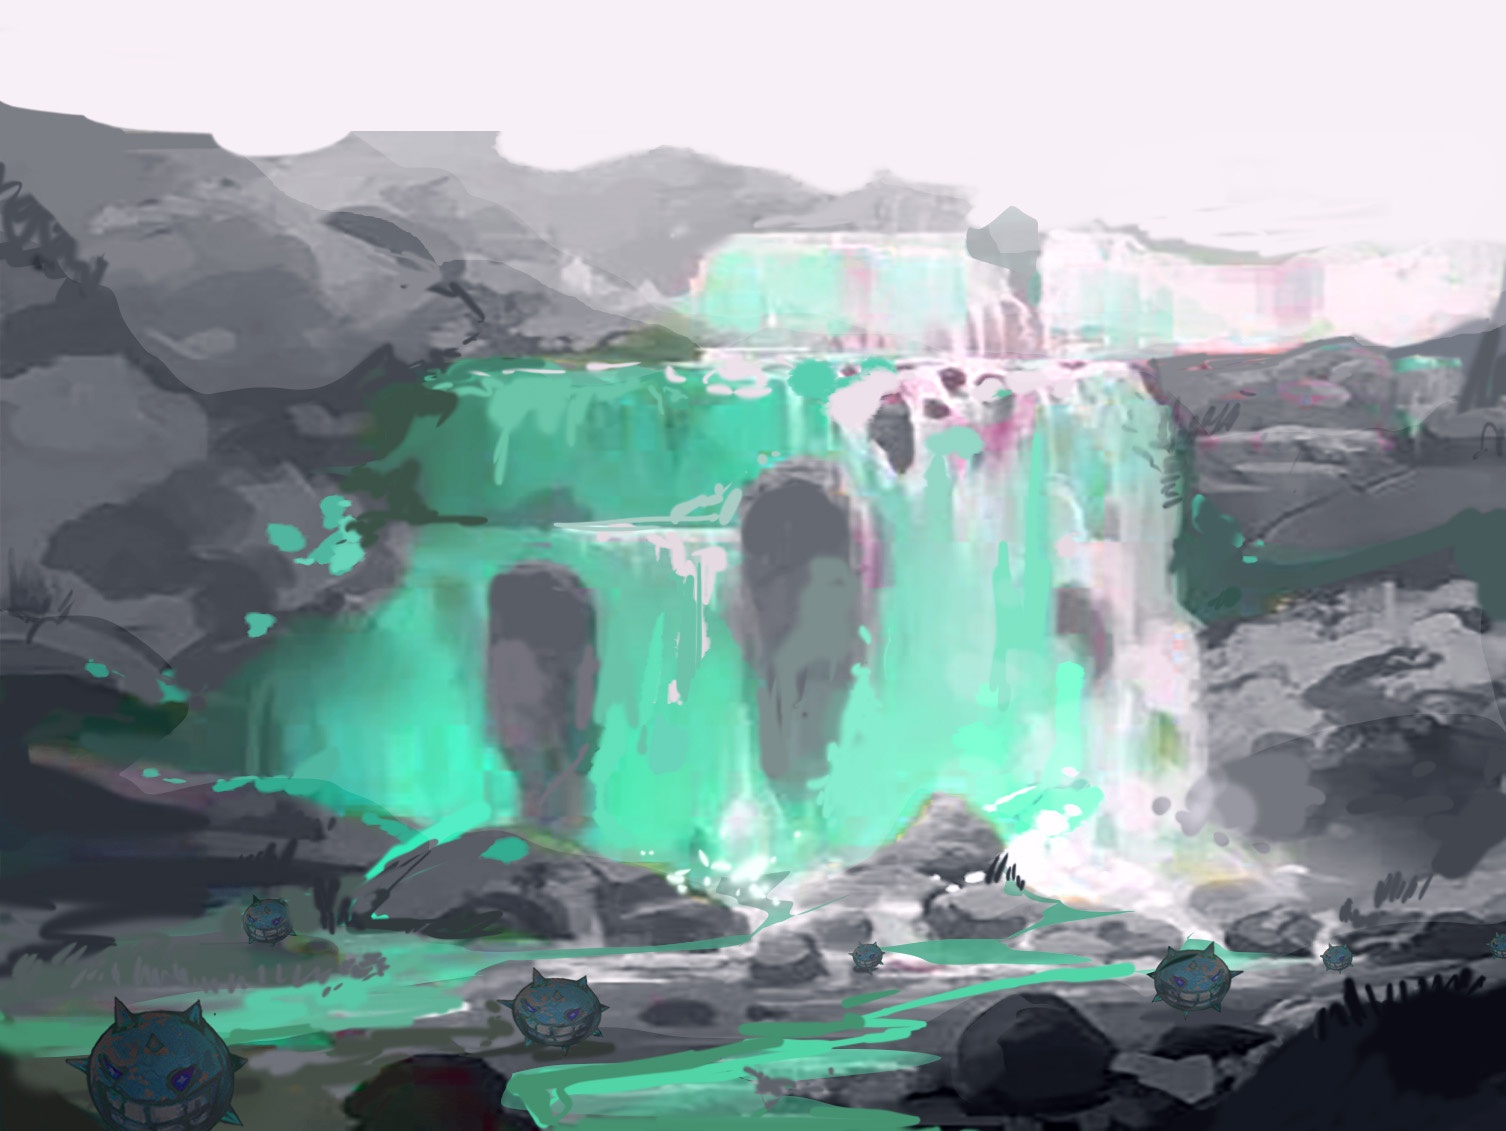
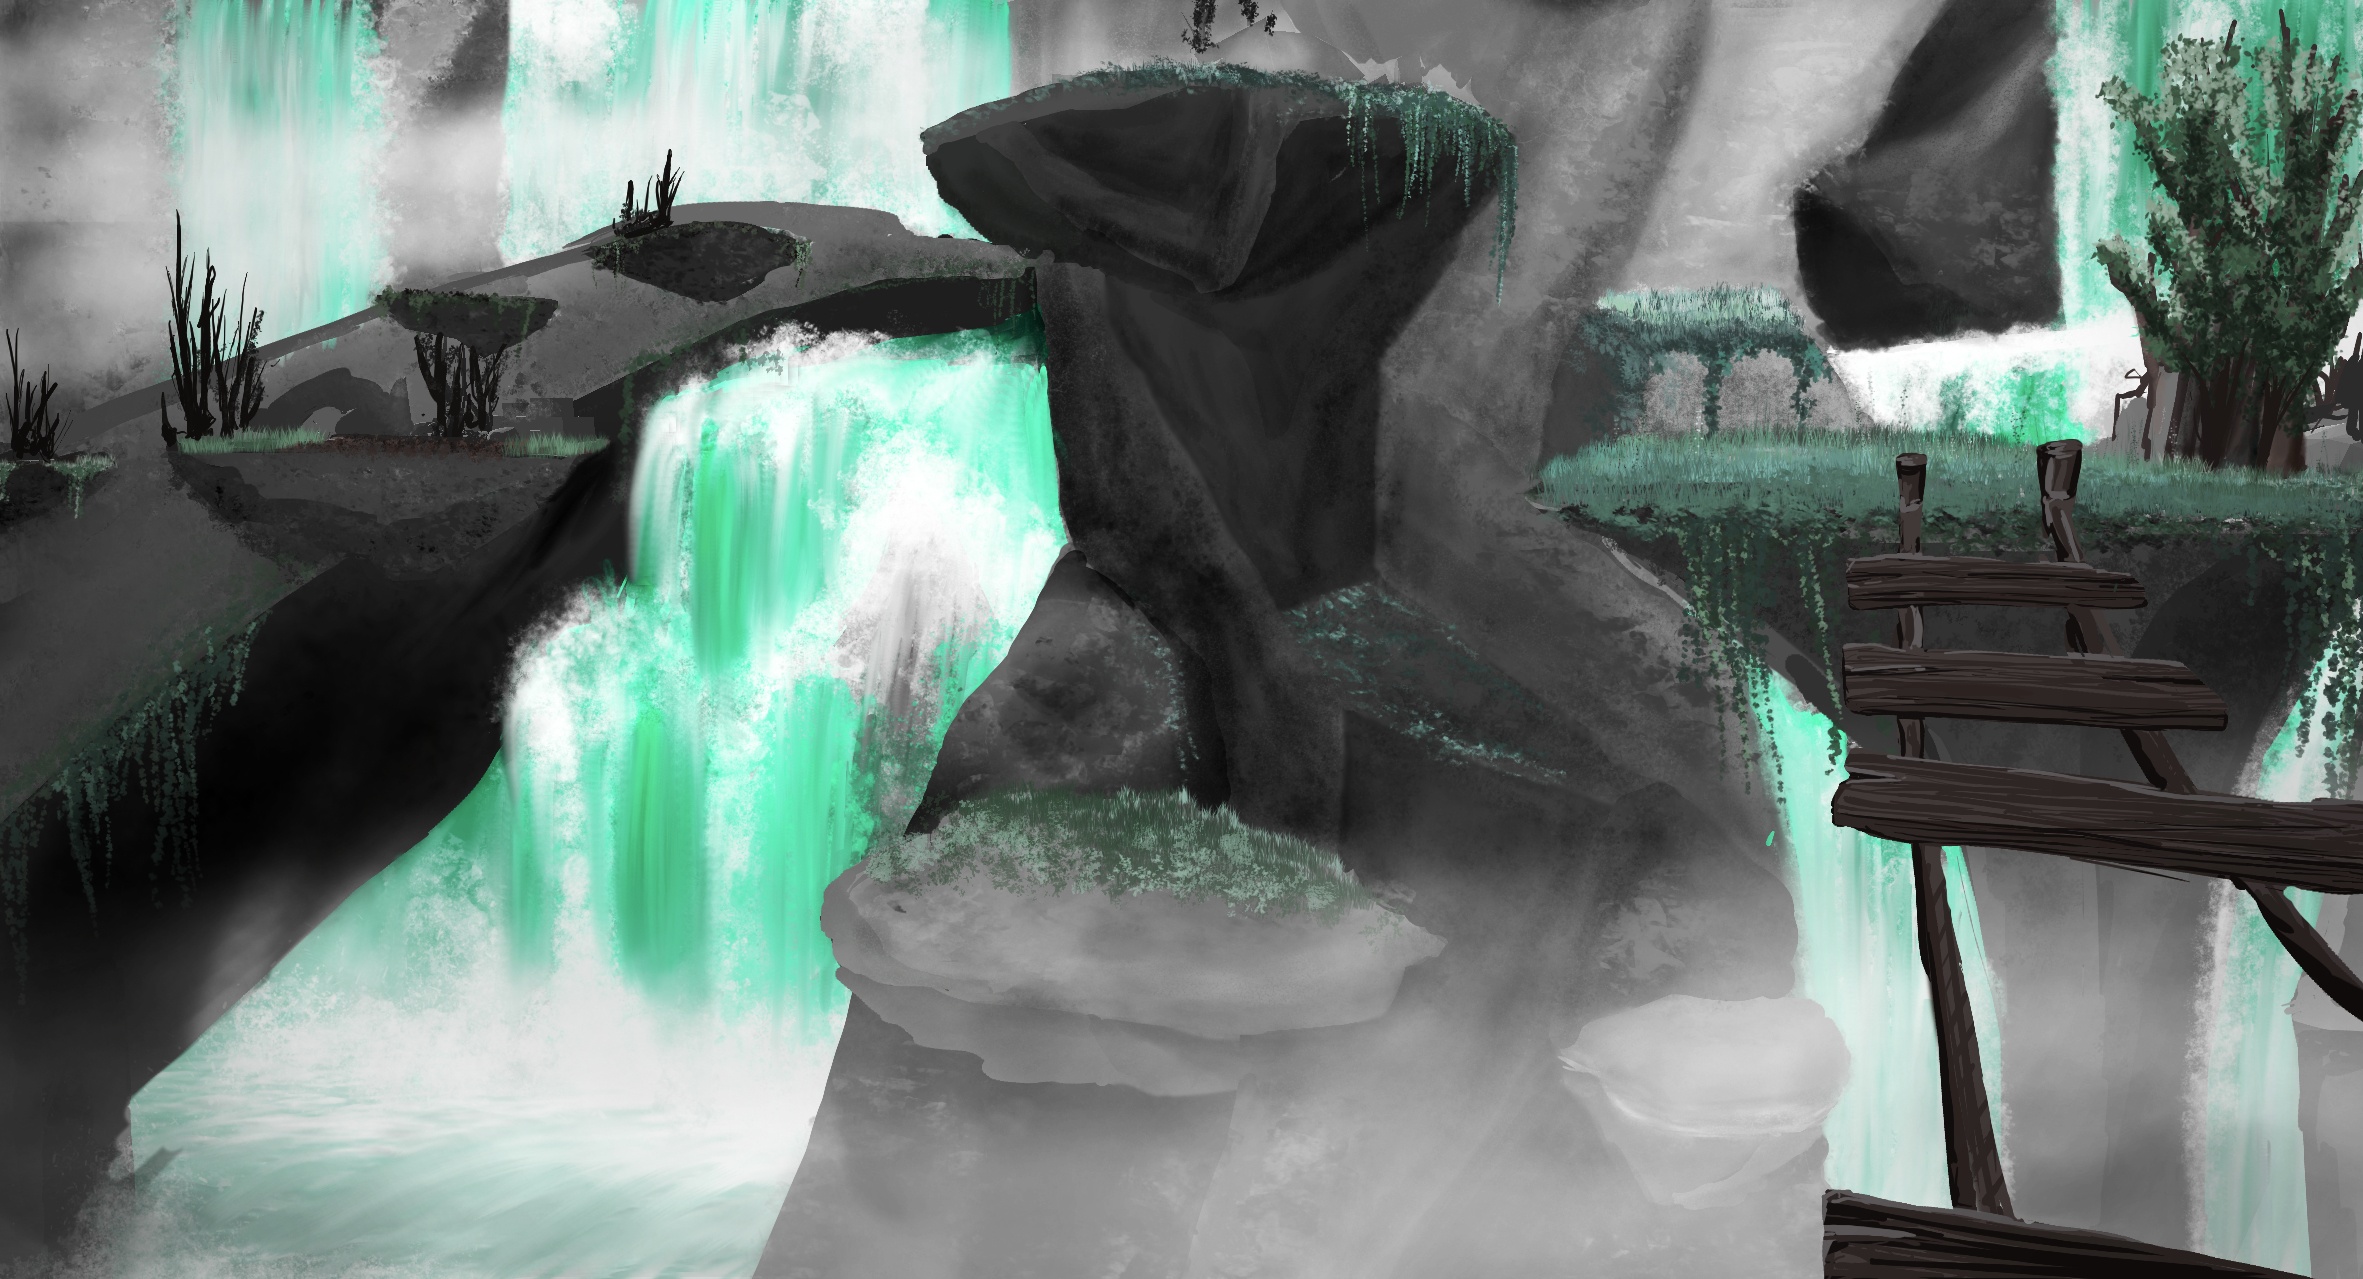
from the neon-colored liquid and win it for themselves. In the beginning, only to feed and not to die of thirst, but soon they realized what incredible possibilities the Neon offered them. They started to build technology fueled by the Neon. Lights and engines were fed by it and after a couple of decades they started to build tech, which strengthened their body. At first it was all about strength and practical tools which helped them in everyday life and at work but soon some people developed weapons which gave them unexpected power and masks that pumped the energy of the Neon directly into their bodies. These people were called hunters, and they were the first to dare to go into the depths of the canyon to seek for the artifact. Not even for them it is an easy journey. And although the descent is lined with plants that glow and shimmer in the most beautiful colors, it is almost always deadly. A thunderous stream of the glowing fluid falls down the gorge - neither up nor down is there any end in sight. Now and then remains of the old civilization can be found, but the deeper it goes, the lonelier and colder it gets. The paths lead down into the mountain where the small streams that drip from the hard rocks are the only source of light. One wrong step from one of the islands and you fall into the endless depths. But the trail is not even the greatest danger. Both flora and fauna had to adapt to the new environment. Mutations developed, a symbiosis with technical features. Plants formed mechanical filters to feed on neon, creatures became more resistant and strengthened their limbs with minerals that were washed to the surface by the glowing liquid. The madness that took hold of so many people turned even the most peaceful animals into unpredictable and aggressive beasts. They are the rulers of this gorge, there is no way around them. They crawl on the ground, hide in crevices or fly through the foggy haze of the darkness. And woe betide anyone who gets too close to them. None of these creatures will ever retreat, killing them is the only option. However, this is easier said than done. But who knows, maybe you will succeed where so many before you failed. |
|
| Anchor |
|---|
| GameMechanics |
|---|
| GameMechanics |
|---|
|
| Panel |
|---|
| | Expand |
|---|
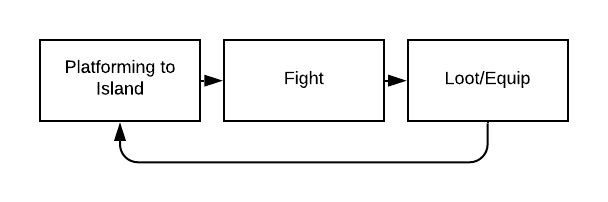
| GAMEPLAY LOOPS
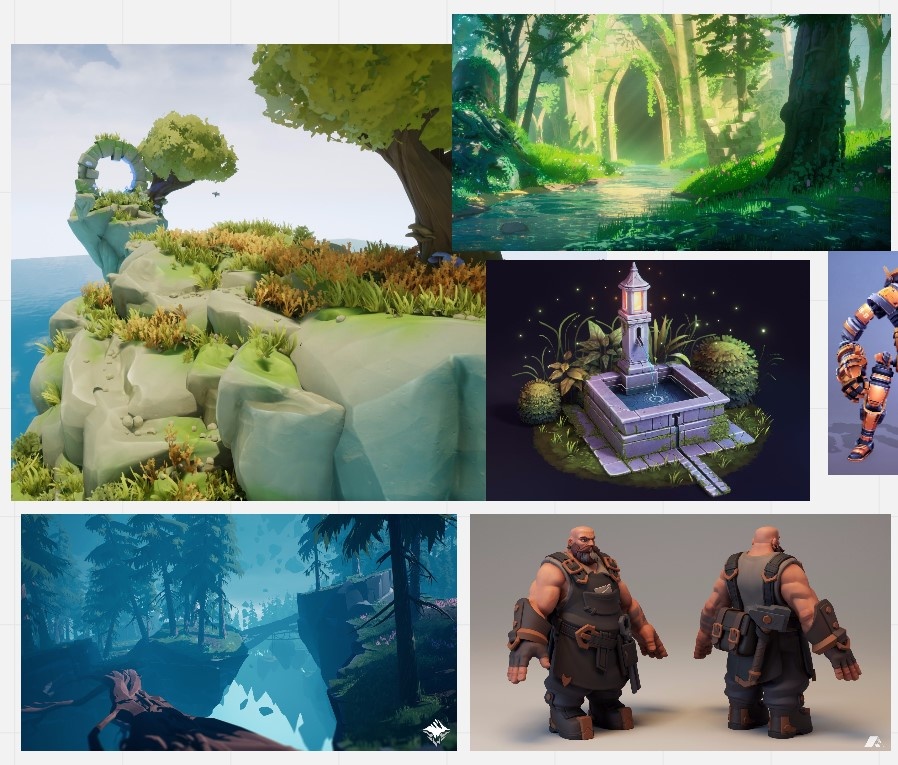
Core Game Loop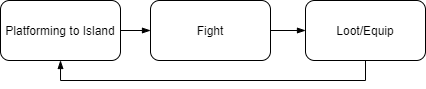 Image Added Image Added
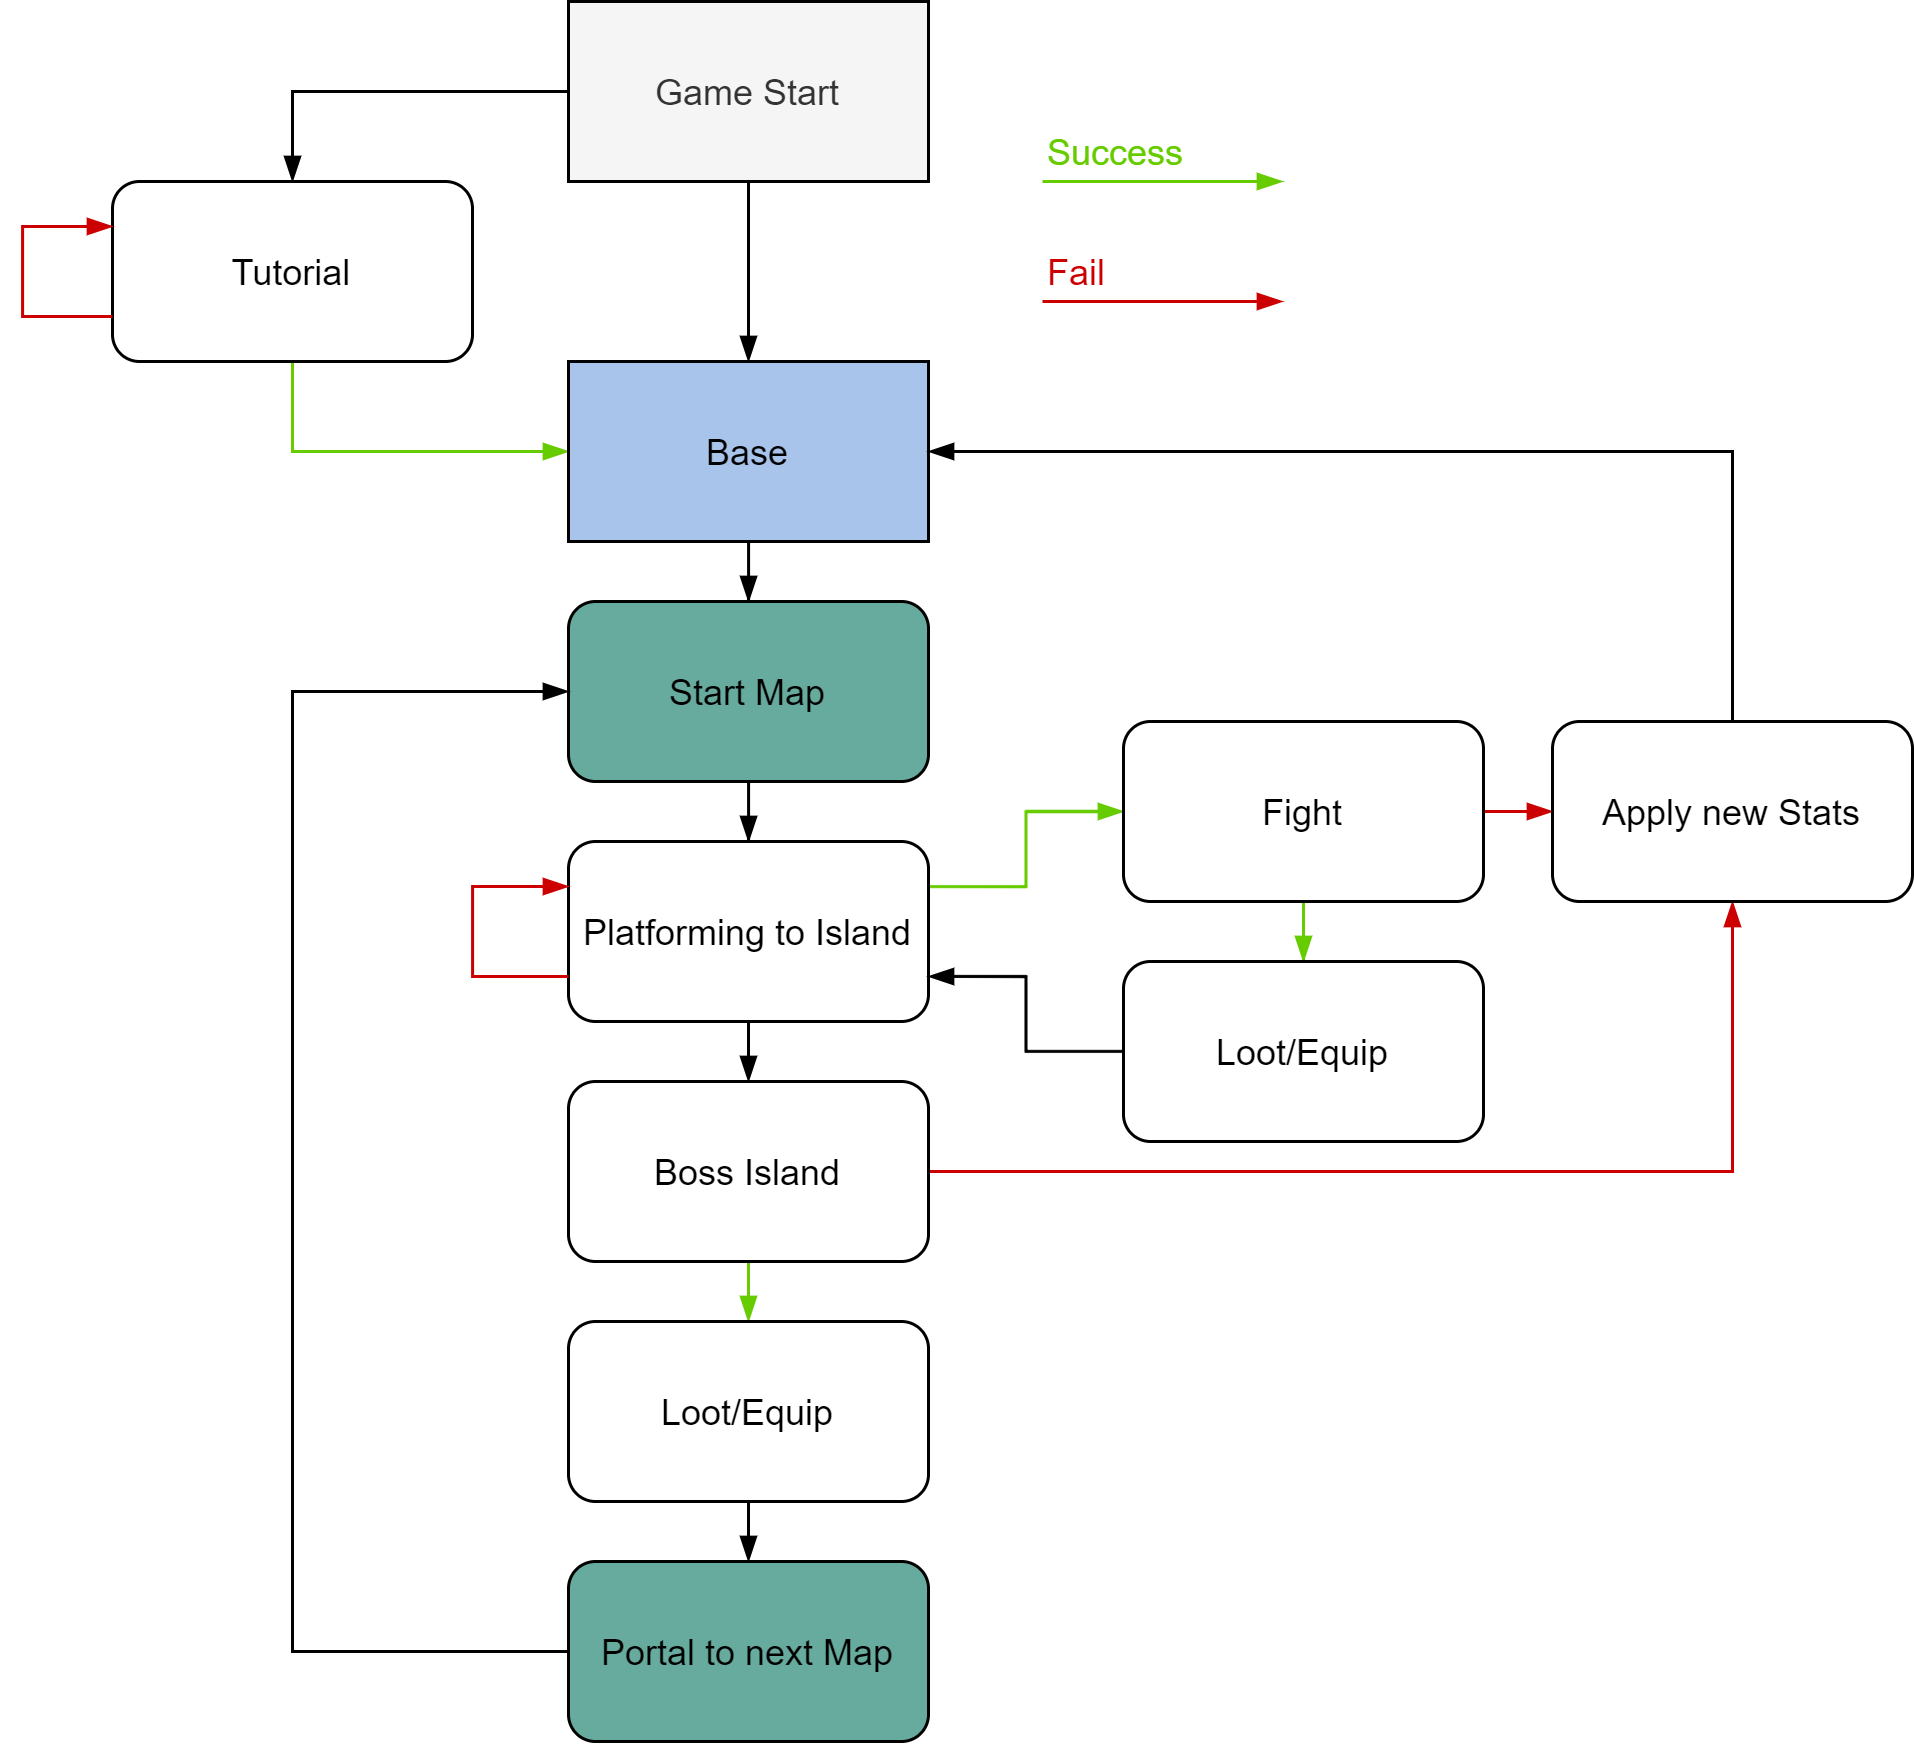 Image Added Image Added
MAP DESIGN
| Column |
|---|
| | Column |
|---|
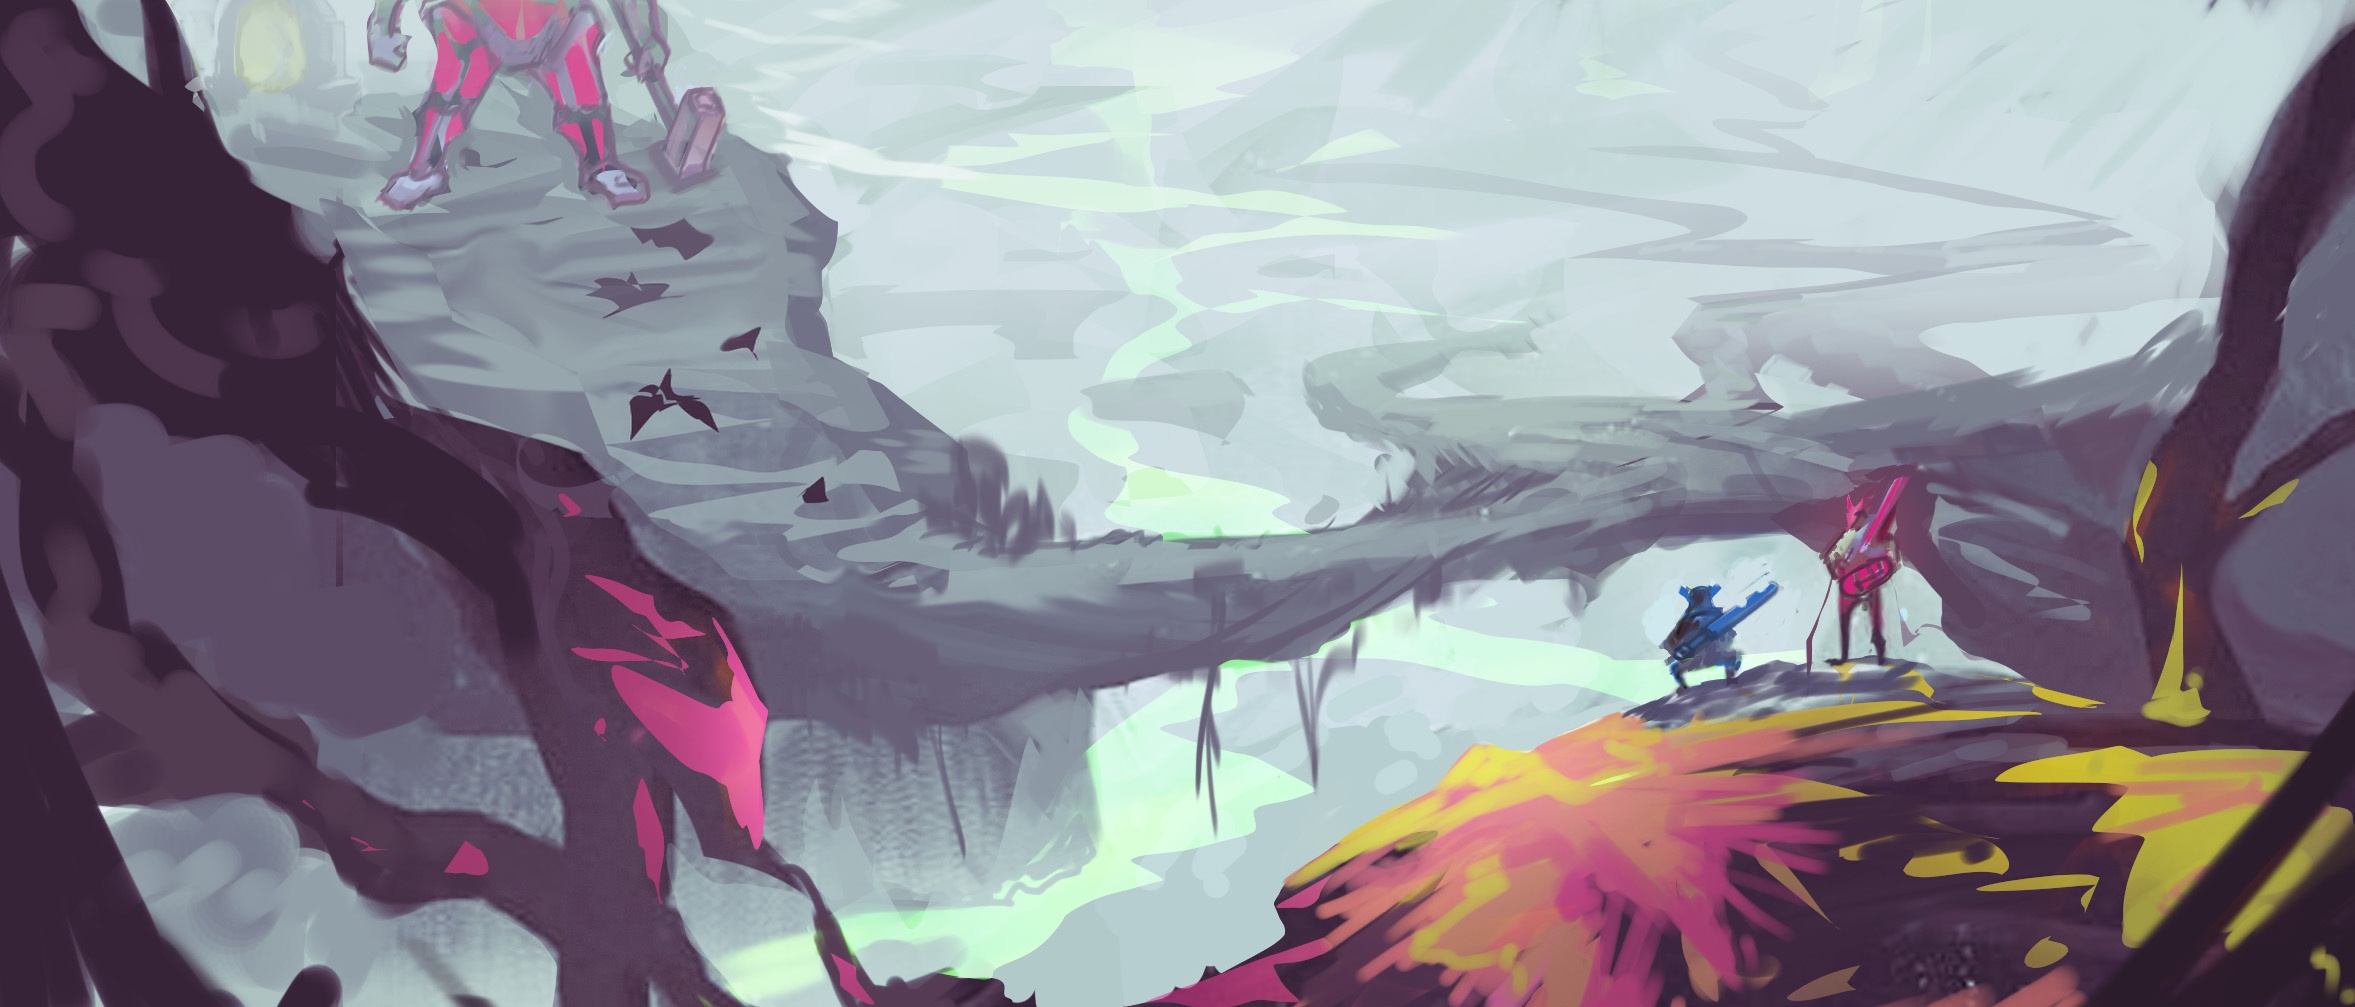
| After jumping down from the base the player lands in the actual play area. The map is designed mostly in vertical space. Starting high up in the mountain the player makes his way downwards to the boss area. On his way he encounters enemies and platforming challenges. The map consists of 'islands' of different size and look. Bigger islands are connected by smaller ones or other platforming elements like rope bridges or jump pads. Islands can be longer path-like sections or actual islands which are hanging as ledges on the mountain or even held in the air by neon boosters. Different types of traps can hurt the player on the way. Further Map features which are distributed on the map: Fountain At the fountain the player can heal and refill his consumable. Also he can decide to change his mask. Shop The shop provides items, temporary item upgrades, health potions, and consumables. Challenge Shrines Challenge shrines are scattered over the map, randomly distributed between set spawn points. The player can activate them which will spawn several waves of enemies with increasing difficulty. There is several variations of shrines: Challenge Shrine of Survival: If the player dies he gets rewarded with an item depending on how many waves he was able to clear. Challenge Shrine of Doom: If the player dies his run ends. If he manages to kill all waves he is rewarded with a legendary item. Challenge Shrine of Speed: Kill as many enemies as possible in a given time for a reward. More slay'n enemies result in a better reward. Challenge Platforming Sections Platforming areas challenge the player with movement puzzles and difficult jumps. At the end there is a reward depending on the time it took the player to complete the section. Falling down will re-spawn the Player at the start or a checkpoint depending on the length of the section. Hidden Loot Across the map precious loot is hidden like mask fragments or rare items. |
| Column |
|---|
| 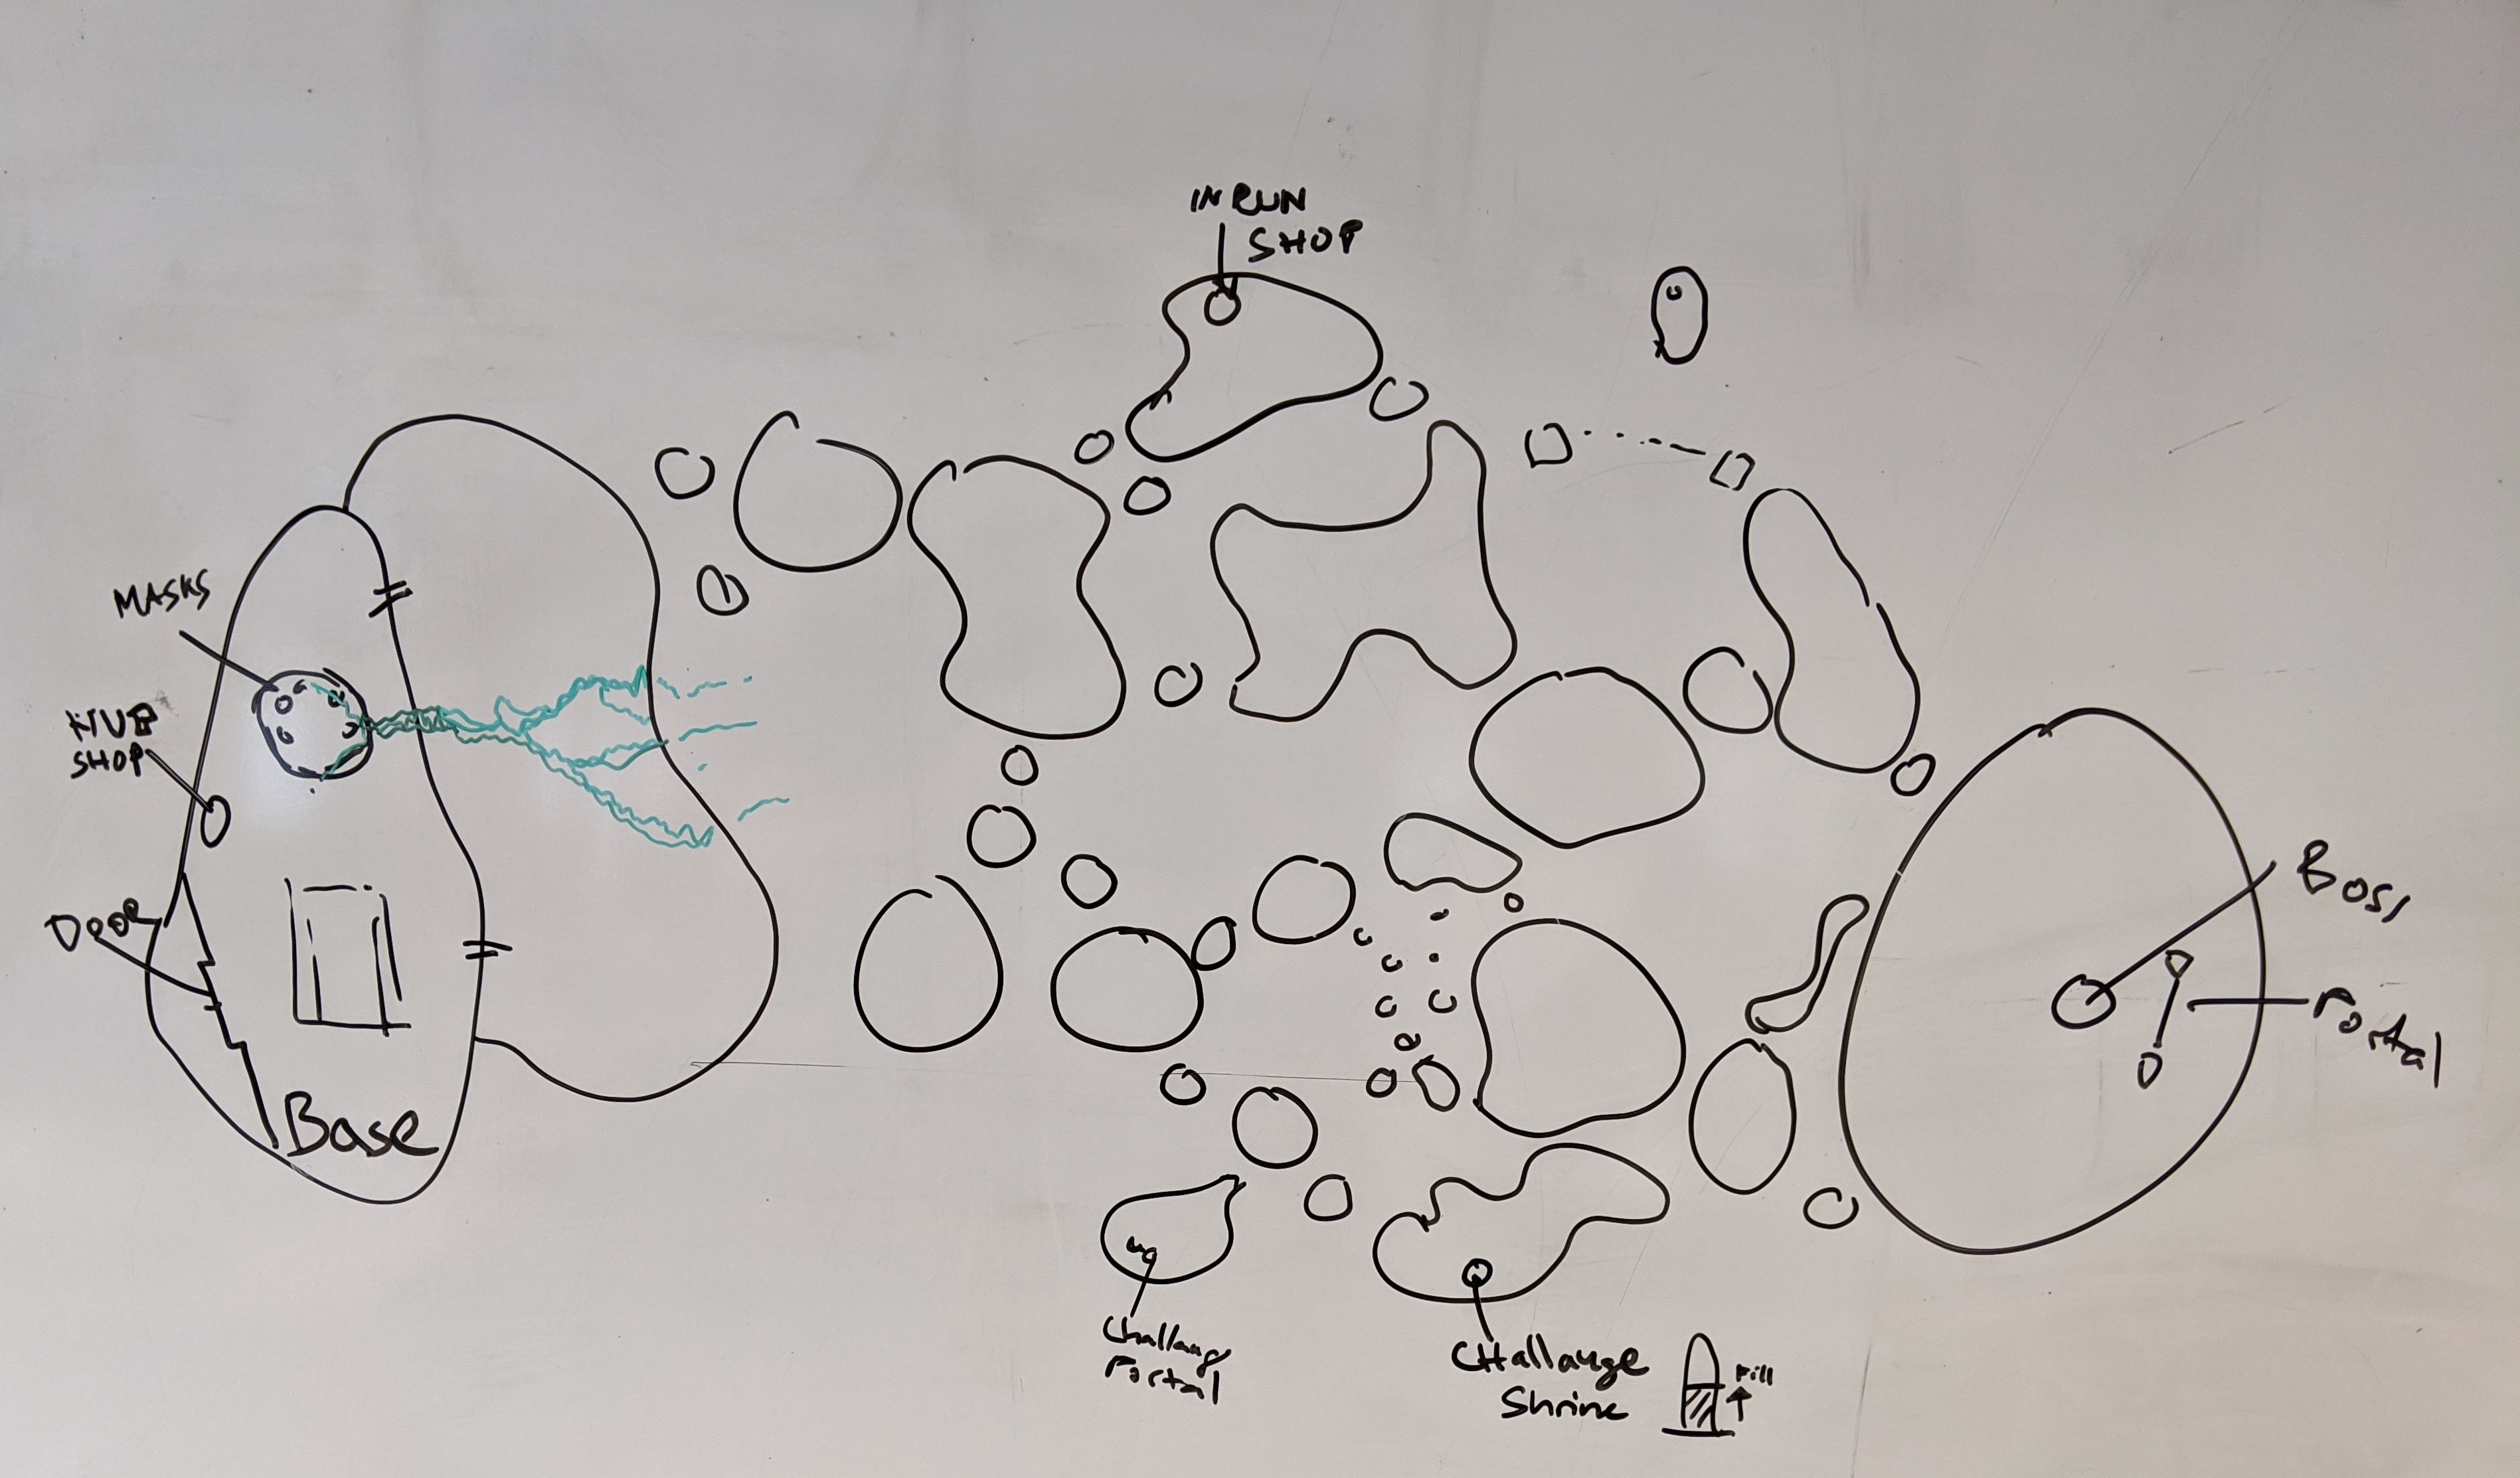 Image Added Image Added
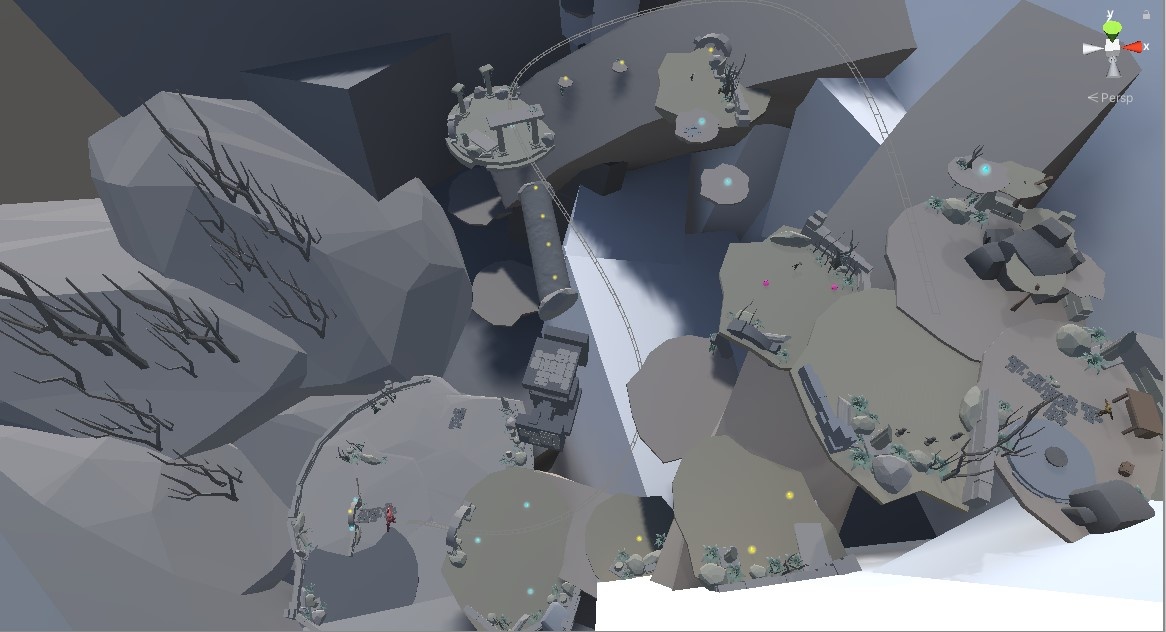 Image Added Image Added
|
COMBAT
| Section |
|---|
| Column |
|---|
| The combat in Groundless should consist of fast-paced action sequences that enable the player to chain multiple moves into each other. Currently 3 types of attack moves are planed: - 3 Attacks that chain into a Light Combo (L)
- 2 Attacks that chain into a Heavy Combo (H)
- Dash Attack (DA)
All these moves can be combined into each other, until the last Attack of either the Heavy or light combo is used. Active Items and Consumables can be used at any time. |
| Column |
|---|
| Combo Tree: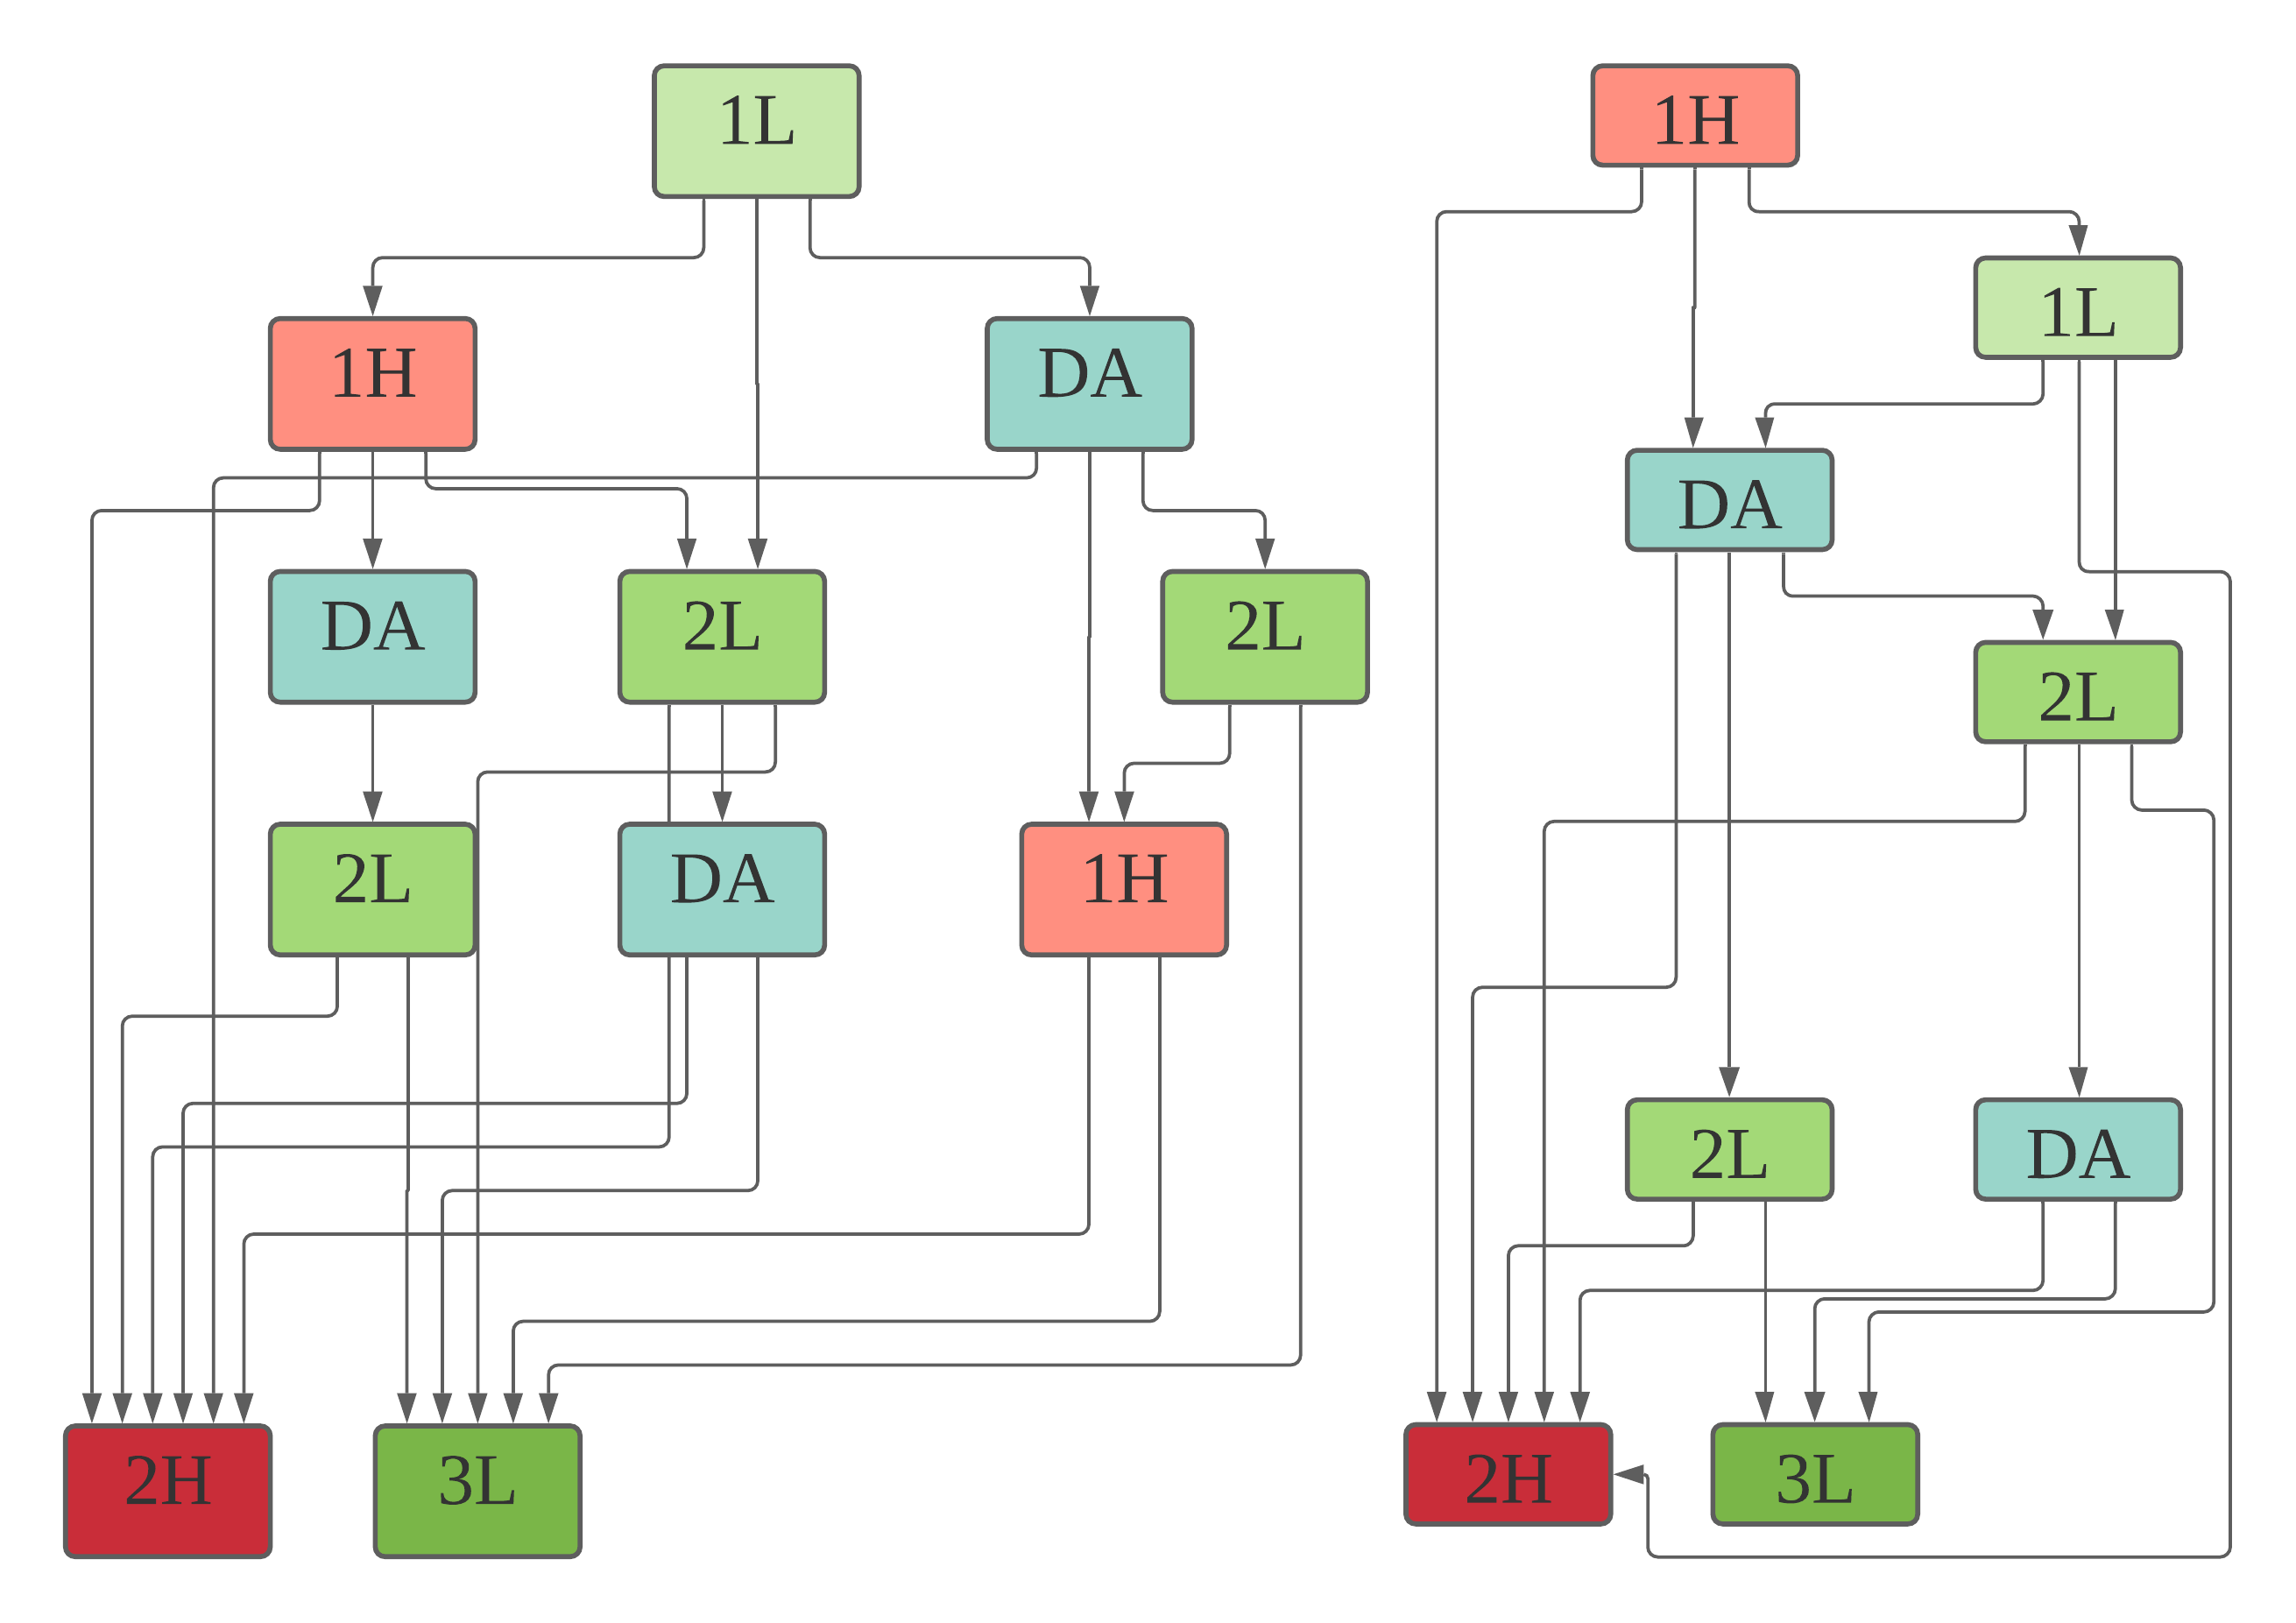 Image Added Image Added
|
|
Situations where the player has to use their movement expertise to get to another place will be a common matter in the game.
The player will be able to overcome platforming segments with the character ground and air movement, jumping and dashing. Platforming segments might arise while fighting enemies as well, but will be less common. - stationary platforms/part of the maps
- moving and rotating platforms
- jump combinations
- reaction games
- running away from danger
- falling rocks
Another usage for platforming segments is to collect small items, find unlockables and discover secrets. EQUIPMENT
There are three kinds of equipment in groundless, masks, items (active/passive) and consumables. While items reset each run, masks are kept and can be improved to provide long term progress. Consumables can be unlocked and upgraded at the item shop located at the base. Masks and items share a categorization: | Category | Color | Icon | Stats |
|---|
| Offense | Red |
| - Attack Damage
- Projectile Damage
- Attack Speed and projectile flying speed
| | Defense | Green |
| | | Fortune | Yellow |
| - Gold gain
- Rarity+ Chance
- Critical hit percentage
- Chance increase
| | Neon | Violett |
| - Splash damage
- Critical hit damage
- Ability amplifier
| | Utility | Blue |
| |
Each mask has only two of the stats shown in the table above per category. MASKS
| Section |
|---|
| Column |
|---|
| Masks in Groundless change the game-play in a similar way like character classes do in most other games. Each mask has special features that make the player play in a certain way. Some have special abilities, some distribute the passive stats in a new way. Masks can be acquired while playing in two ways. Either by finding fragments in hidden places and combining them once a set is complete or by defeating a boss. Before each run the player can decide which mask to wear and therefore what play-style he wants to use. A simple example would be selecting between a defensive mask with high HP and low ATT and an aggressive mask with low HP and strong ATT. The benefits and drawbacks of a base level mask always even out. Mask progressionMasks progress in two ways: UpgradingMasks can be upgraded by defeating enemies. Each defeated enemy provides a certain amount of XP. Once a set amount is reached the mask upgrades to the next level. Each upgrade gives the mask better stats, the drawbacks stay the same. FeedingAfter finishing a run the player can feed the gathered items into the mask he used depending on their category. Every item provides a set amount of progression points based on its rarity. For example, if the item is categorized as "defense" and is of "legendary" rarity he can feed 10 progression points into HP and shield. Each point improves the stat by a set amount. The player can also choose to not spend the points and keep half of them as general points to spend them on any stat of any mask later on. Mask TiersMasks have different tiers. The higher the tier, the harder it is to play. | Tier | Description |
|---|
| T1 | Easy To Play, no need to read the mechanics of the mask | | T2 | Small mechanic details worth reading and thinking about while playing | | T3 | In-depth mechanics whole character is based around. The player needs to fully understand and think about it while playing. | | T4 | Extremely challenging builds which combine high risk and high reward game-play with a high skill ceiling. |
|
| Column |
|---|
| EXAMPLE| (ICON) | Devils Skull (Tier 1) |
|---|
| Base level | (+) Increases the Damage of your Character throughout the run and burns enemies when damaging. This effect does only stack whilst being in-run. (-) Enemies can steal your Stacks on-hit. Killing those will restore your stacks. | | Lvl. 1 | Killing and enemy increases your Attack Damage by 1 | | Lvl. 2 | Killing an enemy increases your Attack Damage by 1. Hitting enemies applies a burn effect that deals 10 Damage each second for 2s | | Lvl. 3 | Killing an enemy increases your Attack Damage by 2. Hitting enemies applies a burn effect that deals 10 Damage each second for 10s. | | Category | Stats | | Offense | - Attack Damage
- Attack Speed and projectile flying speed
| | Defense | | | Fortune | - Critical hit percentage
- Chance increase
| | Neon | - Critical hit damage
- Ability amplifier
| | Utility | |
|
|
ITEMS
| Section |
|---|
| Column |
|---|
| Items can be found during runs by either killing enemies or finding them at hidden places. The player starts the save game with a rather small pool of items to not confuse him and give him something to look forward to as he can unlock more items by playing. An item can be unlocked by completing small challenges. Less complex items demand easier challenges like “deal 1000 damage” or “die 20 times” which can be unlocked by simply playing a lot. More complex items have harder challenges like “beat boss 1 in under 2 minutes”, “kill a boss with less than 1% hp left” or defeat 5 enemies simultaneously”. Besides visual information like names and icons items have following attributes: Effect and stacking effectEvery item that the player finds will give him bonuses on his stats. If a player finds more than one copy of an item in a run, its effect gets stacked up to a maximum of 3 copies which improves its effect. If an item is found 4 times it evolves to an advanced version with an additional effect. In this example the stacking effect is “Attack heals +1 hp”. Apart from the empowered version, the improvement is linear. With each stack, the item is worth 1x, 2x, 3x, ... the amount of progression points. If the player gets an item a 5th time it will be the base version which can be stacked again. Upgraded ItemItems can be permanently upgraded to provide more end-game possibilities, strategies and a feeling of greater power. Upgrading is expensive and can be done at the upgrade station at the Hub. | Info |
|---|
| What stats do these upgrades give |
DescriptionEach item has a short description that explains the effect of the item in simple words. RarityItems can have the following 4 rarity levels which can be found on islands of different difficulty: | Rarity | Progression Points | Effect of Rarity | Can be found on... |
|---|
| Common | 1 | The higher the rarity the better are the stats it provides.
| Easy and medium islands | | Uncommon | 3 | Medium and hard islands | | Rare | 5 | Hard and Boss islands | | Legendary | 10 | Boss islands and hidden places |
Active/PassiveActive items can be used by the player by pressing the assigned button while passive items passively boost the stats of the player in many different ways. Active items have an activation cost which stands for the amount of neon it consumes on use. While active items consume neon, passive don't. The player can loot and stack as many passive items as he wants, active items are limited to one at the time. Active items can be stacked and empowered like passives. The player can decide to swap his active item for another but he will loose all stacks he collected during the run. Finding ItemsItems can be found when defeating enemies or completing platforming challenges. Each drop has 3 Items whose category is random, the rarity depends on the difficulty of the island. For example, if the island is a medium hard one, most likely all three items have uncommon rarity. Occasionally one or more items are of one grade higher rarity (rarity+). The player then has to choose one of the items to keep. |
| Column |
|---|
| EXAMPLE| Name | Bulwark | | Active/Passive | Passive | | Rarity | Common | | Category | Defensive | | Activation Cost | none | | Effect | Max HP +30 | | Stacking Effect | Max HP +30 | | Empowered Effect | Max HP +150 and a chance to root the enemy | | Description | The bulwark improves the players max HP |
|
|
CONSUMABLES
The player can take one consumable per run with him. Consumables are kind of active items with a passive effect, like restoring HP. Consumables have a cooldown-time. GAME PROGRESSION
The player should be eased into the game, providing more difficulty later on. For this game, difficult parts should also be available early on, because the same map is run multiple times to offer engaging and also new map features throughout the whole playtime. Stats for items should increase linearly per level, so that effects from items can benefit from each other more, so longer runs with more items will result in a larger impact that items can offer. A power spike should occur quite early in the game from collecting items and defeating enemies, so that no "very good" runs are needed for fast progression. Later on, the player will need better personal player skill, higher stats and good item builds to easily progress further. Further grinding stats or improving their own playstyle and item decisions will lead to further progression(i.e. unlocking new features). BASE
| Section |
|---|
| Column |
|---|
| The base is the area where the player hangs out between runs and manages his masks and items and tests abilities. The Fountain is the spring of neon all tech and masks at the base are fed from. Found Masks sit on pedestals at a temple-like structure. The player can select which one to use for the next run and apply progression points at the middle of the platform. Defeated monsters can be found as statues in a garden. Statues have signs which can be read for more information like weaknesses and attack moves. Information about items can be read at the Item Codex. The Shrine opens once the player found all masks. Inside is an altar where map modifiers can be applied. At the Shop the player can buy upgrades for the base and map. At the Item Upgrade shop the player can upgrade items so he directly finds empowered versions of it. Or buy a chance to directly find empowered items. Also he can unlock and upgrade consumables. The Item Chest gives the player the opportunity to try out items and builds by providing all items the player has unlocked so far. The player can take as many items as he wants from the Chest. No items will be brought to a run. |
| Column |
|---|
| 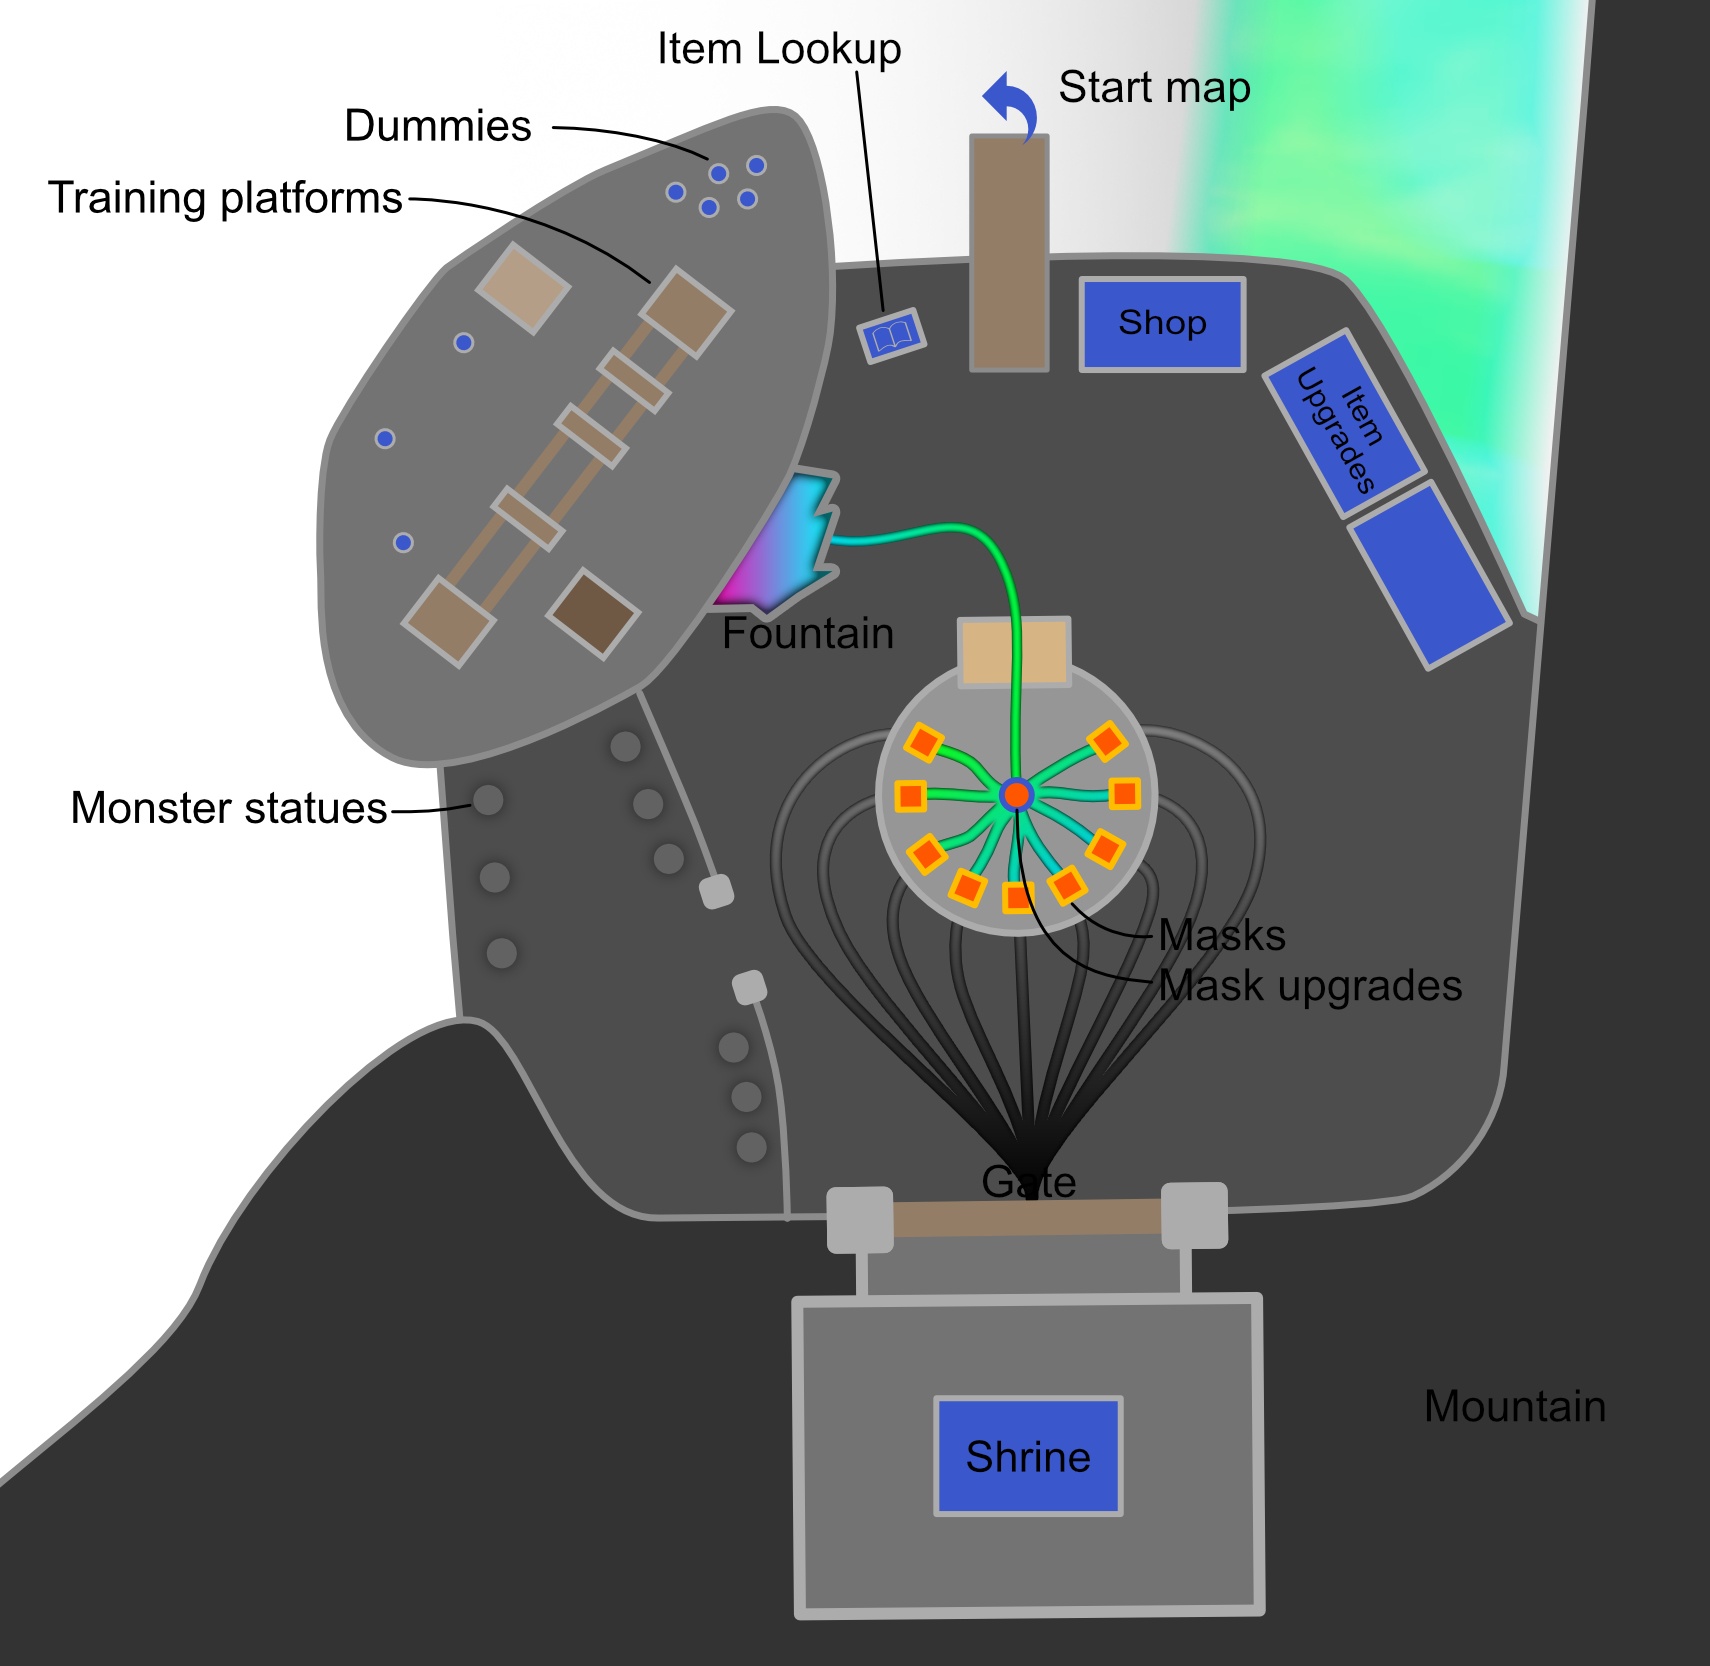 Image Added Image Added
|
|
TUTORIAL
| Column |
|---|
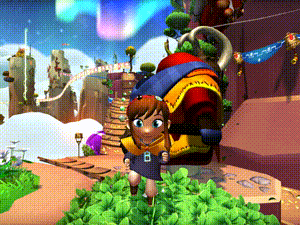
| Groundless has a tutorial where a 'first-time-player' can learn the Core Gameloop and basic mechanics. When starting the game for the first time the player sees a splash screen which requires him to continue. Afterwards he lands directly in the tutorial. He will find himself on an island with two paths in front of him. The most basic controls are shown in a diegetic way or by UI boxes. Both paths will eventually merge again and on both the player had to fight some weak enemies, got rewarded with an item and had to traverse simple platforming elements. Equipped wit his new item the player has to fight a mini-boss which will be a bit harder than the normal monsters. This boss drops the player his first mask he has to equip. He then walks along the path and has the base in front of him, covered in thick fog that clears up on approach. The next time the player starts the game, he will land directly in the base after the splash screen. |
| Column |
|---|
| 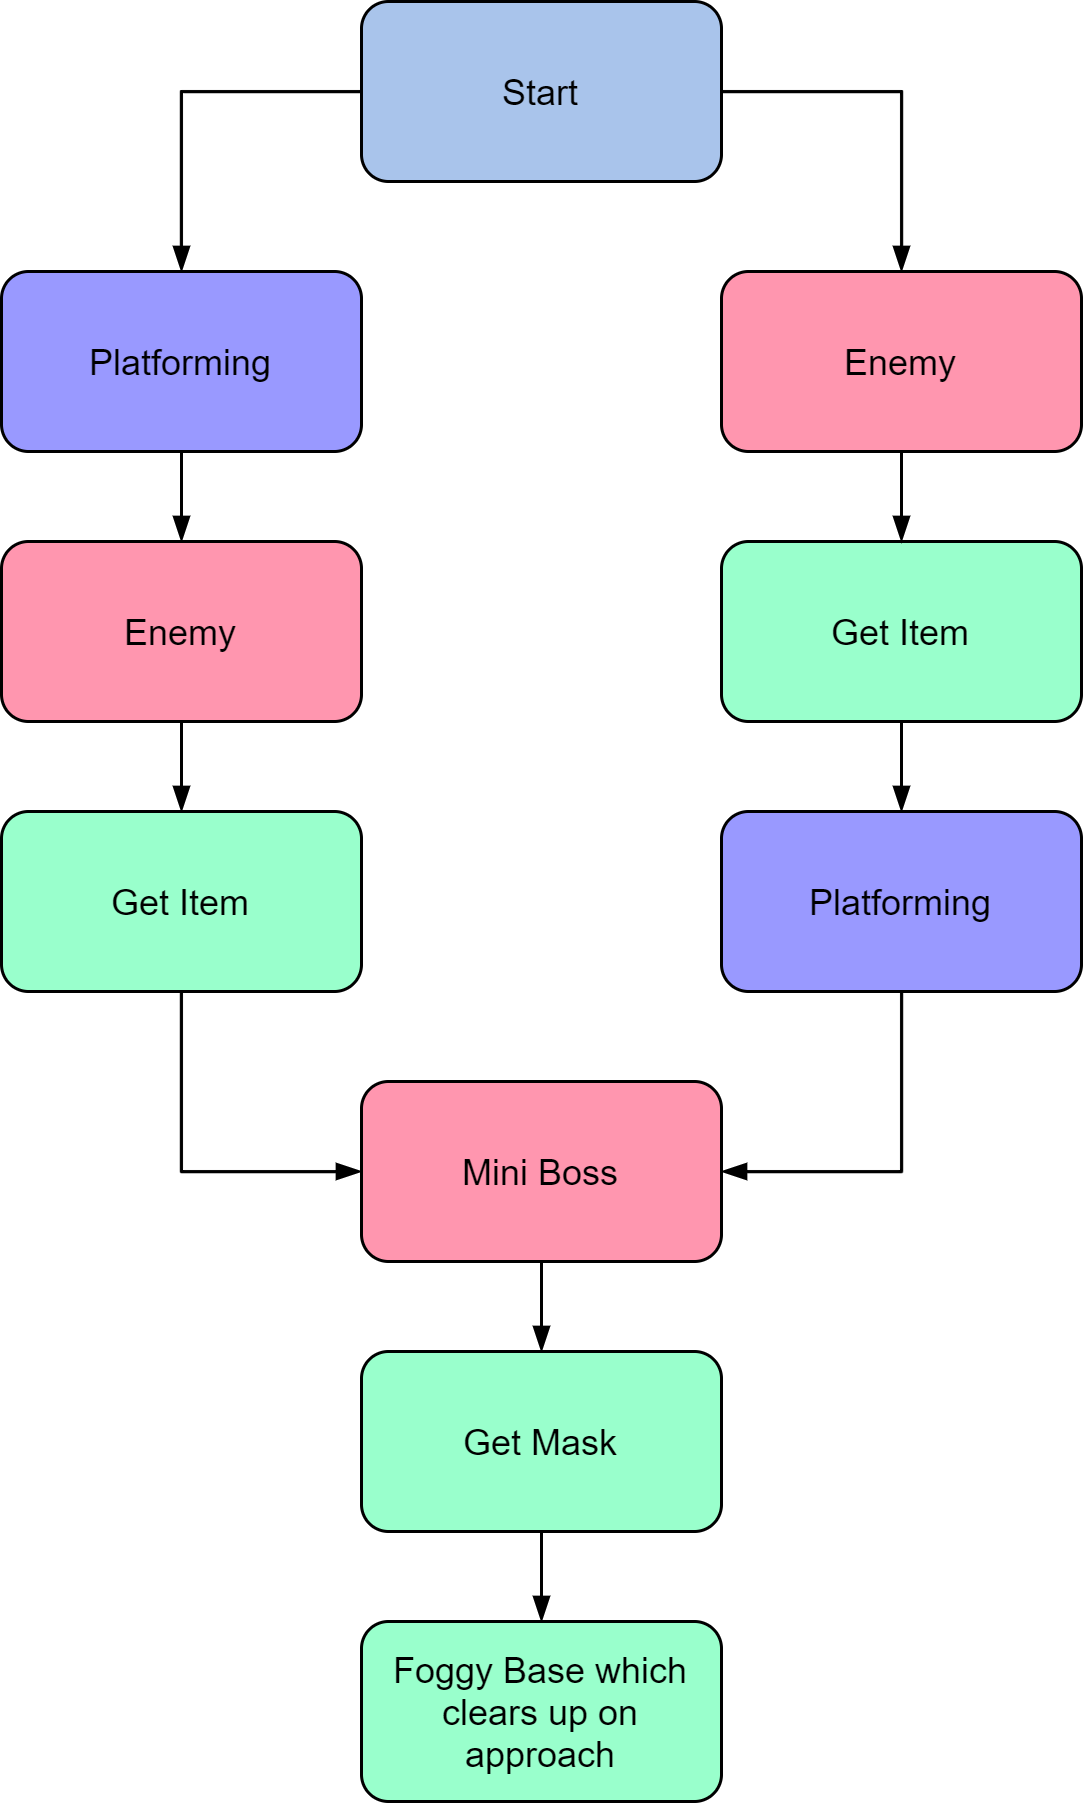 Image Added Image Added
|
CAMERA
A Third-Person Camera follows behind the player. The distance is variable when moving the camera to look from above, or to look from below. The camera mustn't clip through the player. If the camera clips through the environment, the environment should render in a transparent way, to make it see-through.
|
|
|
| Anchor |
|---|
| SecondsGameplay |
|---|
| SecondsGameplay |
|---|
|
| Panel |
|---|
| | Expand |
|---|
| title | 5. 30 Seconds Of Gameplay |
|---|
| 30 SECONDS OF GAMEPLAY
| Section |
|---|
Context and Setup| Column |
|---|
| You find yourself between the gigantic cliffs of Tortus Mountains. You are able to see shimmering lights in the distance and glowing tropical-looking plants in a rocky mountainous path. Neon rivers stream along the rocks and crevices of the area, creating strong currents and small waterfalls wherever they flow. A gloomy but soft atmospheric tune is playing. You just cleared an area of enemies which rewarded you with an item that increased your attack damage by 30 points. Of the 70 Max HP, you only have 50 Health Points left. |
| Column |
|---|
| Looking ahead you are able to see an old worn-down wooden rope bridge, on the right you see an entrance to a cave with a hint of bright red lights reflecting from the walls. The camera is positioned behind you in a third-person view, and you are able to rotate it freely around your playable character. |
|
| Section |
|---|
Player Actions| Column |
|---|
| Feeling adventurous you decide to cross the old wooden rope bridge. While moving to the bridge you realize that the bridge is moving slightly from side to side and that wooden boards on the bridge are missing, creating gaps. As you come closer to the bridge you try to internalize the swinging of the bridge to prepare for the upcoming jump sequence. - You run up to the first gap, hitting the jump button, jumping over the gap and landing on the next wooden board.
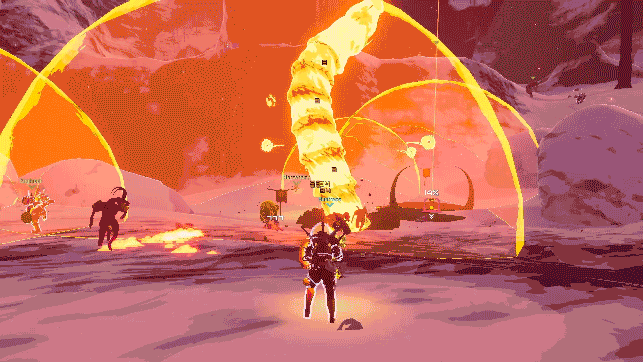
Continuing to run you try to adapt to the bridges movement and adjust your angle to be able to jump over the next gap. A larger gap longer than the length of one jump is facing you. Jumping and using your dash in the air makes you traverse this gap as well. After landing on the last wooden board of the rope bridge and setting foot on stable land again, you see an area with an unlit torch ahead. You decide to approach the torch and run towards it. Once you are in approx. 5m range of the torch, 3 Mosquito-looking like creatures which have a sword-like mouthpart appear around you - the atmospheric tune changes into a more full and exciting tune, signalling battle. Deciding to jump straight into action, you turn to the closest mosquito enemy and press the dash button followed by the light attack button, resulting in the character dashing forward towards the mosquito and doing a quick melee attack dealing 15 damage and splattering colorful liquid to the ground (You see the number floating above it's head and a bar indicating it's current health points appears). Meanwhile the other 2 mosquitoes are flying towards you. You follow-up with a light attack by pressing the light attack button dealing 17 damage and splattering colorful liquid to the ground (You see the number floating above it's head and the health bar shows around 50% HP). While hitting with another light attack you see one of the other mosquitoes stopping in it's flight and light up, you hear a noise coming from it (Signalling that it charges it's dash attack). You hit the mosquito with your 2nd Light Attack Combo dealing 25 damage, knockbacking the mosquito and splattering colorful liquid to the ground (You see the number floating above it's head and the health bar shows around 20% HP). You decide to walk out of the line of the mosquito that seems to charge up an attack, meanwhile the third mosquito is charging it's attack, lighting up and making a sound. The mosquito that was charging an attack charges forward, trying to stab you with it's sword and missing you, stopping near the third mosquito. You decide to finish the first mosquito by dashing back to it and attacking it dealing another 15 damage and splattering colorful liquid to the ground (You see the number floating above it's head and the health bar is completely empty). The mosquito falls to the ground releasing more colorful liquid and slowly disappears while making a sound. The third mosquito is charging into you with it's sword-shaped mouthpart and dealing 12 damage to you. You see your health bar depleting and hear your character crying out. You activate your active item that is able to pull 2 enemies together, to chain and pull the 2 mosquitoes together, making them get pulled in the middle of the 2 positions of where they were, interrupting all the activities they were doing. You decide to get closer to the 2 mosquitoes, using a well-placed dash attack to be able to damage both at once. Hitting both with your dash attack deals 15 damage each and splattering colorful liquid to the ground (You see each number floating above their head and a bar indicating their current health points appear).
|
| Column |
|---|
| - You hit the Heavy Attack Button to chain the dash attack into a heavy Area of Effect hit, striking a large AOE effect on the ground, releasing waves of energy around you dealing 20 damage to both mosquitoes interrupting them and splattering more colorful liquid to the ground (You see each number floating above their head and a bar indicating their current health to be at around 50%).
- Thinking that the second heavy attack might not deal enough damage you decide to use a light hit on one of the mosquitoes instead.
- Hitting the light attack button the first light attack is used, dealing 17 damage to one mosquito and splattering colorful liquid to the ground (You see the number floating above it's head and the health bar shows around 25% HP).
- You decide to use your second heavy attack and finish your combo chain, using a more powerful strike on the ground, releasing large waves of energy around you, knockbacking the mosquitoes and dealing 30 damage to each releasing colorful liquid (You see the number floating above each mosquitoes head and the health bar is empty for one and around 5% for the other mosquito).
- The mosquito with no HP left falls to the ground releases more colorful liquid and slowly disappears, while making a sound.
- The one mosquito left, a few meters away from you starts to charge up it's attack again, lighting up and making a sound to signalize it's charging.
- You try to get close to it as fast as possible, dashing towards it and striking it with a light attack dealing 17 damage and splattering colorful liquid to the ground (You see the number floating above it's head and the health bar is empty).
- The mosquito has no HP left and falls to the ground releasing more colorful liquid and slowly disappearing, while making a sound.
- After all mosquitoes died, the torch lights up in a colorful blue flame and a shimmering orb appears close to you.
- When being close to the shimmering orb, a small window appears with 3 icons that represent items.
- You are able to select and take a closer look at the 3 items, that each have a category showcasing it's type of use and a rarity.
- You take a closer look at the item on the left, which has an effect to reduce the incoming damage you receive by 5 per hit(to a minimum of 1).
- You select the next item which has a chance to release a colorful orb dealing 10 damage, whenever you hit an enemy with a melee attack.
- You select the third item which seems to be an active item that is able to spawn a small colorful orb that circles around you, deals 10 damage on contact, and lasts for 10 seconds on use. You seem to be able to replace your current active item with this one, or using this item to upgrade your current active item.
- You decide to get the item that can release a colorful orb whenever you hit an enemy with a melee attack and select it.
- Pressing the Interact Button will make the shimmering item orb disappear and reward you with the selected item.
- You look around, seeing small torches lead a way further into the depths.
- You decide to go further into the void
|
|
|
|
|